


Robots.txt and SEO: Everything You Need to Know

Former Head of Content at Ahrefs
Robots.txt is one of the simplest files on a website, but it's also one of the easiest to mess up. Just one character out of place can wreak havoc on your SEO and prevent search engines from accessing important content on your site.
This is why robots.txt misconfigurations are extremely common—even amongst experienced SEO professionals.
In this guide, you'll learn:
What is a robots.txt file?
A robots.txt file tells search engines where they can and can’t go on your site.
Primarily, it lists all the content you want to lock away from search engines like Google. You can also tell some search engines (not Google) how they can crawl allowed content.
important note
Most search engines are obedient. They aren't in the habit of breaking an entry. That said, some aren't shy about picking a few metaphorical locks.
Google isn't one of those search engines. They obey the instructions in a robots.txt file.
Just know that some search engines ignore it completely.
What does a robots.txt file look like?
Here's the basic format of a robots.txt file:
Sitemap: [URL location of sitemap]

User-agent: [bot identifier]
[directive 1]
[directive 2]
[directive ...]

User-agent: [another bot identifier]
[directive 1]
[directive 2]
[directive ...]
If you've never seen one of these files before, that might seem daunting. However, the syntax is quite simple. In short, you assign rules to bots by stating their user-agent followed by directives.
Let's explore these two components in more detail.
User-agents
Each search engine identifies itself with a different user-agent. You can set custom instructions for each of these in your robots.txt file. There are hundreds of user-agents, but here are some useful ones for SEO:
- Google: Googlebot
- Google Images: Googlebot-Image
- Bing: Bingbot
- Yahoo: Slurp
- Baidu: Baiduspider
- DuckDuckGo: DuckDuckBot
Sidenote
All user-agents are case sensitive in robots.txt.
You can also use the star (*) wildcard to assign directives to all user-agents.
For example, let's say that you wanted to block all bots except Googlebot from crawling your site. Here's how you'd do it:
User-agent: *
Disallow: /

User-agent: Googlebot
Allow: /
Know that your robots.txt file can include directives for as many user-agents as you like. That said, every time you declare a new user-agent, it acts as a clean slate. In other words, if you add directives for multiple user-agents, the directives declared for the first user-agent don't apply to the second, or third, or fourth, and so on.
The exception to that rule is when you declare the same user-agent more than once. In that case, all relevant directives are combined and followed.
IMPORTANT NOTE
Crawlers only follow the rules declared under the user-agent(s) that most accurately applies to them. That's why the robots.txt file above blocks all bots except Googlebot (and other Google bots) from crawling the site. Googlebot ignores the less specific user-agent declaration.
Directives
Directives are rules that you want the declared user-agents to follow.
Supported directives
Here are directives that Google currently supports, along with their uses.
Disallow
Use this directive to instruct search engines not to access files and pages that fall under a specific path. For example, if you wanted to block all search engines from accessing your blog and all its posts, your robots.txt file might look like this:
User-agent: *
Disallow: /blog
Sidenote
If you fail to define a path after the disallow directive, search engines will ignore it.
Allow
Use this directive to allow search engines to crawl a subdirectory or page—even in an otherwise disallowed directory. For example, if you wanted to prevent search engines from accessing every post on your blog except for one, then your robots.txt file might look like this:
User-agent: *
Disallow: /blog
Allow: /blog/allowed-post
In this example, search engines can access /blog/allowed-post. But they can't access:
/blog/another-post/blog/yet-another-post/blog/download-me.pdf
Both Google and Bing support this directive.
Sidenote
As with the disallow directive, if you fail to define a path after the allow directive, search engines will ignore it.
a note about conflicting rules
Unless you're careful, disallow and allow directives can easily conflict with one another. In the example below, we're disallowing access to /blog/ and allowing access to /blog.
User-agent: *
Disallow: /blog/
Allow: /blog
In this case, the URL /blog/post-title/ seems to be both disallowed and allowed. So which wins?
For Google and Bing, the rule is that the directive with the most characters wins. Here, that's the disallow directive.
Disallow: /blog/(6 characters)Allow: /blog (5 characters)
If the allow and disallow directives are equal in length, then the least restrictive directive wins. In this case, that would be the allow directive.
Sidenote
Here, /blog (without the trailing slash) is still accessible and crawlable.
Crucially, this is only the case for Google and Bing. Other search engines listen to the first matching directive. In this case, that's disallow.
Sitemap
Use this directive to specify the location of your sitemap(s) to search engines. If you're unfamiliar with sitemaps, they generally include the pages that you want search engines to crawl and index.
Here's an example of a robots.txt file using the sitemap directive:
Sitemap: https://www.domain.com/sitemap.xml

User-agent: *
Disallow: /blog/
Allow: /blog/post-title/
How important is including your sitemap(s) in your robots.txt file? If you've already submitted through Search Console, then it's somewhat redundant for Google. However, it does tell other search engines like Bing where to find your sitemap, so it's still good practice.
Note that you don't need to repeat the sitemap directive multiple times for each user-agent. It doesn't apply to only one. So you're best to include sitemap directives at the beginning or end of your robots.txt file. For example:
Sitemap: https://www.domain.com/sitemap.xml

User-agent: Googlebot
Disallow: /blog/
Allow: /blog/post-title/

User-agent: Bingbot
Disallow: /services/
Google supports the sitemap directive, as do Ask, Bing, and Yahoo.
Sidenote
You can include as many sitemaps as you like in your robots.txt file.
Unsupported directives
Here are the directives that are no longer supported by Google—some of which technically never were.
Crawl-delay
Previously, you could use this directive to specify a crawl delay in seconds. For example, if you wanted Googlebot to wait 5 seconds after each crawl action, you'd set the crawl-delay to 5 like so:
User-agent: Googlebot
Crawl-delay: 5That said, be careful when setting this directive, especially if you have a big site. If you set a crawl-delay of 5 seconds, then you're limiting bots to crawl a maximum of 17,280 URLs a day. That's not very helpful if you have millions of pages, but it could save bandwidth if you have a small website.
Noindex
This directive was never officially supported by Google. However, until recently, it's thought that Google had some "code that handles unsupported and unpublished rules (such as noindex)." So if you wanted to prevent Google from indexing all posts on your blog, you could use the following directive:
User-agent: Googlebot
Noindex: /blog/
However, on September 1st, 2019, Google made it clear that this directive is not supported. If you want to exclude a page or file from search engines, use the meta robots tag or x-robots HTTP header instead.
Nofollow
This is another directive that Google never officially supported, and was used to instruct search engines not to follow links on pages and files under a specific path. For example, if you wanted to stop Google from following all links on your blog, you could use the following directive:
User-agent: Googlebot
Nofollow: /blog/
Google announced that this directive is officially unsupported on September 1st, 2019. If you want to nofollow all links on a page now, you should use the robots meta tag or x-robots header. If you want to tell Google not to follow specific links on a page, use the rel="nofollow" link attribute.
Do you need a robots.txt file?
Having a robots.txt file isn't crucial for a lot of websites, especially small ones.
That said, there's no good reason not to have one. It gives you more control over where search engines can and can't go on your website, and that can help with things like:
- Preventing the crawling of duplicate content;
- Keeping sections of a website private (e.g., your staging site);
- Preventing the crawling of internal search results pages;
- Preventing server overload;
- Preventing Google from wasting "crawl budget."
- Preventing images, videos, and resources files from appearing in Google search results.
Note that while Google doesn't typically index web pages that are blocked in robots.txt, there's no way to guarantee exclusion from search results using the robots.txt file.
Like Google says, if content is linked to from other places on the web, it may still appear in Google search results.
How to find your robots.txt file
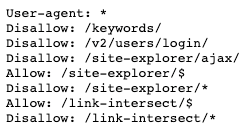
If you already have a robots.txt file on your website, it'll be accessible at domain.com/robots.txt. Navigate to the URL in your browser. If you see something like this, then you have a robots.txt file:
How to create a robots.txt file
If you don't already have a robots.txt file, creating one is easy. Just open a blank .txt document and begin typing directives. For example, if you wanted to disallow all search engines from crawling your /admin/ directory, it would look something like this:
User-agent: *
Disallow: /admin/
Continue to build up the directives until you're happy with what you have. Save your file as "robots.txt."
Alternatively, you can also use a robots.txt generator like this one.
The advantage of using a tool like this is that it minimizes syntax errors. That's good because one mistake could result in an SEO catastrophe for your site—so it pays to err on the side of caution.
The disadvantage is that they're somewhat limited in terms of customizability.
Where to put your robots.txt file
Place your robots.txt file in the root directory of the subdomain to which it applies. For example, to control crawling behavior on domain.com, the robots.txt file should be accessible at domain.com/robots.txt.
If you want to control crawling on a subdomain like blog.domain.com, then the robots.txt file should be accessible at blog.domain.com/robots.txt.
Robots.txt file best practices
Keep these in mind to avoid common mistakes.
Use a new line for each directive
Each directive should sit on a new line. Otherwise, it'll confuse search engines.
Bad:
User-agent: * Disallow: /directory/ Disallow: /another-directory/Good:
User-agent: *
Disallow: /directory/
Disallow: /another-directory/Use wildcards to simplify instructions
Not only can you use wildcards (*) to apply directives to all user-agents, but also to match URL patterns when declaring directives. For example, if you wanted to prevent search engines from accessing parameterized product category URLs on your site, you could list them out like this:
User-agent: *
Disallow: /products/t-shirts?
Disallow: /products/hoodies?
Disallow: /products/jackets?
…
But that's not very efficient. It would be better to simplify things with a wildcard like this:
User-agent: *
Disallow: /products/*?
This example blocks search engines from crawling all URLs under the /product/ subfolder that contain a question mark. In other words, any parameterized product category URLs.
Use "$" to specify the end of a URL
Include the "$" symbol to mark the end of a URL. For example, if you wanted to prevent search engines accessing all .pdf files on your site, your robots.txt file might look like this:
User-agent: *
Disallow: /*.pdf$
In this example, search engines can't access any URLs ending with .pdf. That means they can't access /file.pdf, but they can access /file.pdf?id=68937586 because that doesn't end with ".pdf".
Use each user-agent only once
If you specify the same user-agent multiple times, Google doesn't mind. It will merely combine all rules from the various declarations into one and follow them all. For example, if you had the following user-agents and directives in your robots.txt file…
User-agent: Googlebot
Disallow: /a/

User-agent: Googlebot
Disallow: /b/
… Googlebot wouldn't crawl either of those subfolders.
That said, it makes sense to declare each user-agent only once because it's less confusing. In other words, you're less likely to make critical mistakes by keeping things neat and simple.
Use specificity to avoid unintentional errors
Failure to provide specific instructions when setting directives can result in easily-missed mistakes that can have a catastrophic impact on your SEO. For example, let's assume that you have a multilingual site, and you're working on a German version that will be available under the /de/ subdirectory.
Because it isn't quite ready to go, you want to prevent search engines from accessing it.
The robots.txt file below will prevent search engines from accessing that subfolder and everything in it:
User-agent: *
Disallow: /de
But it will also prevent search engines from crawling of any pages or files beginning with /de.
For example:
/designer-dresses//delivery-information.html/depeche-mode/t-shirts//definitely-not-for-public-viewing.pdf
In this instance, the solution is simple: add a trailing slash.
User-agent: *
Disallow: /de/
Use comments to explain your robots.txt file to humans
Comments help explain your robots.txt file to developers—and potentially even your future self. To include a comment, begin the line with a hash (#).
# This instructs Bing not to crawl our site.
User-agent: Bingbot
Disallow: /
Crawlers will ignore everything on lines that start with a hash.
Use a separate robots.txt file for each subdomain
Robots.txt only controls crawling behavior on the subdomain where it's hosted. If you want to control crawling on a different subdomain, you'll need a separate robots.txt file.
For example, if your main site sits on domain.com and your blog sits on blog.domain.com, then you would need two robots.txt files. One should go in the root directory of the main domain, and the other in the root directory of the blog.
Example robots.txt files
Below are a few examples of robots.txt files. These are mainly for inspiration but if one happens to match your requirements, copy-paste it into a text document, save it as "robots.txt" and upload it to the appropriate directory.
All-Access for all bots
User-agent: *
Disallow:
Sidenote
Failing to declare a URL after a directive renders that directive redundant. In other words, search engines ignore it. That's why this disallow directive has no effect on the site. Search engines can still crawl all pages and files.
No access for all bots
User-agent: *
Disallow: /
Block one subdirectory for all bots
User-agent: *
Disallow: /folder/
Block one subdirectory for all bots (with one file within allowed)
User-agent: *
Disallow: /folder/
Allow: /folder/page.html
Block one file for all bots
User-agent: *
Disallow: /this-is-a-file.pdf
Block one filetype (PDF) for all bots
User-agent: *
Disallow: /*.pdf$
Block all parameterized URLs for Googlebot only
User-agent: Googlebot
Disallow: /*?
How to audit your robots.txt file for errors
Robots.txt mistakes can slip through the net fairly easily, so it pays to keep an eye out for issues.
To do this, regularly check for issues related to robots.txt in the "Coverage" report in Search Console. Below are some of the errors you might see, what they mean, and how you might fix them.
Need to check for errors related to a certain page?
Paste a URL into Google's URL Inspection tool in Search Console. If it's blocked by robots.txt, you should see something like this:
Submitted URL blocked by robots.txt
This means that at least one of the URLs in your submitted sitemap(s) are blocked by robots.txt.
If you created your sitemap correctly and excluded canonicalized, noindexed, and redirected pages, then no submitted pages should be blocked by robots.txt. If they are, investigate which pages are affected, then adjust your robots.txt file accordingly to remove the block for that page.
You can use Google's robots.txt tester to see which directive is blocking the content. Just be careful when doing this. It's easy to make mistakes that affect other pages and files.
Blocked by robots.txt
This means you have content blocked by robots.txt that isn't currently indexed in Google.
If this content is important and should be indexed, remove the crawl block in robots.txt. (It's also worth making sure that the content isn't noindexed). If you've blocked content in robots.txt with the intention of excluding it from Google's index, remove the crawl block and use a robots meta tag or x-robots-header instead. That's the only way to guarantee the exclusion of content from Google's index.
Sidenote
Removing the crawl block when attempting to exclude a page from the search results is crucial. Fail to do this, and Google won't see the noindex tag or HTTP header—so it will stay indexed.
Indexed, though blocked by robots.txt
This means that some of the content blocked by robots.txt is still indexed in Google.
Once again, if you're trying to exclude this content from Google's search results, robots.txt isn't the correct solution. Remove the crawl block and instead use a meta robots tag or x-robots-tag HTTP header to prevent indexing.
If you blocked this content by accident and want to keep it in Google's index, remove the crawl block in robots.txt. This may help to improve the visibility of the content in Google search.
Recommended reading:How to Fix “indexed, though blocked by robots.txt” in GSC
FAQs
Here are a few frequently asked questions that didn't fit naturally elsewhere in our guide. Let us know in the comments if anything is missing, and we'll update the section accordingly.
What's the maximum size of a robots.txt file?
500 kilobytes (roughly).
Where is robots.txt in WordPress?
Same place: domain.com/robots.txt.
How do I edit robots.txt in WordPress?
Either manually, or using one of the many WordPress SEO plugins like Yoast that let you edit robots.txt from the WordPress backend.
What happens if I disallow access to noindexed content in robots.txt?
Google will never see the noindex directive because it can't crawl the page.
Final thoughts
Robots.txt is a simple but powerful file. Use it wisely, and it can have a positive impact on SEO. Use it haphazardly and, well, you'll live to regret it.
Got more questions? Leave a comment or ping me on Twitter.
Joshua Hardwick is the Head of Content at Ahrefs. He's been involved in SEO for 11 years and specializes in link building and outreach. Before working for Ahrefs, Joshua ran an SEO business providing link building and consultancy services.
His work has been referenced by many well-known publications including The New York Times, TechCrunch, The Independent and The Verge, and he's spoken at some of the industry's largest conferences including BrightonSEO, Digital Marketer Skill Share, Digital Olympus, and Benchmark Search.

Keep learning



Your weekly marketing’s must-reads
Join 284K marketers for weekly news, useful reads, industry updates, and the memes you didn’t know you needed.
Explore what’s inside the newsletter →