Both of these things are true, but it’s important to remember that WordPress is just a content management system (CMS). So the mere fact that you’re using WordPress isn’t enough to rank on search engines.
Luckily, WordPress makes it super easy to implement many SEO best practices.
In this guide, we’ll cover 20 WordPress SEO optimization best practices, share tips to help you rank higher, and explain how to implement them on your WordPress website.
20 WordPress SEO Best Practices
Here’s how to improve SEO on WordPress by using the following best practices.
- Check search engine visibility settings
- Set preferred domain
- Set up permalinks
- Require manual approval for blog comments
- Install an SEO-friendly theme
- Install an all-in-one SEO plugin
- Make sure to generate a sitemap
- Exclude low-value content from indexing
- Install Ahrefs’ SEO plugin
- Write a “clickworthy” title
- Set an SEO-friendly URL slug
- Use headers to create hierarchy
- Internally link to relevant content
- Add alt text to images
- Write a compelling title tag
- Write a compelling meta description
- Nest pages in subfolders
- Install WP Rocket
- Minify code
- Install ShortPixel
There’s a checkbox in WordPress that, if checked, is effectively an SEO death sentence for your website because it prevents Google from indexing your pages. And if Google can’t index your pages, they can’t rank.
You’ll find this under Settings > Reading > Search engine visibility:
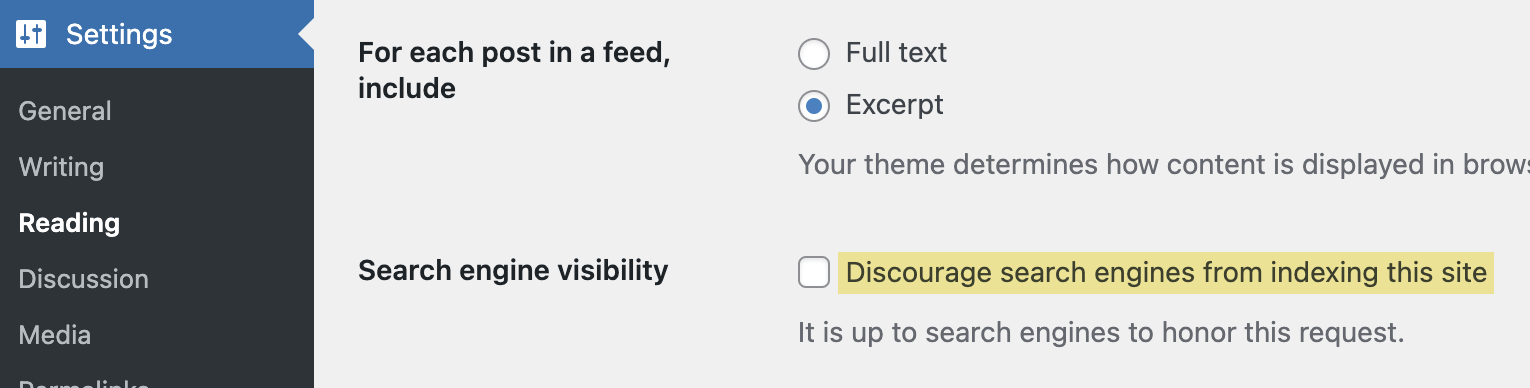
Make sure this is unchecked if you want to stand any chance of ranking whatsoever.
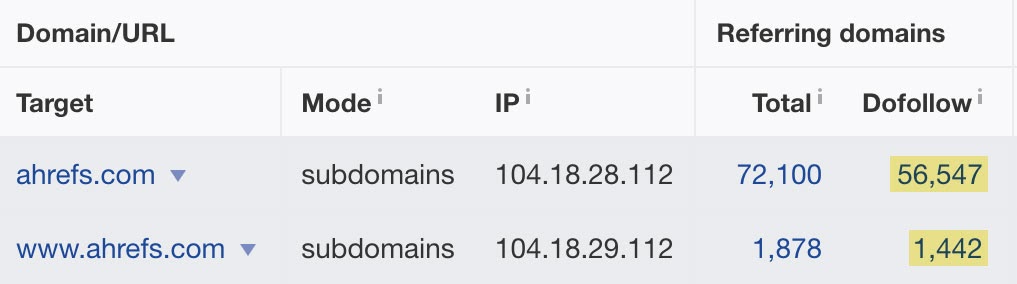
Google looks at domain.com and www.domain.com separately, so it’s important to choose a preferred version for your site. You can do this under Settings > General. Just set the WordPress Address (URL) and Site Address (URL) to your preferred version.

For a new website, it doesn’t really matter which version you choose. But if your pages are accessible at both URL versions, your best bet is to use the version with the most backlinks.
To see which version this is, plug them both into Ahrefs’ Batch Analysis tool and check their referring domains.
For us, it’s clearly the non-www version:
The beauty of WordPress is it automatically redirects the other version to the preferred version so that search engines and visitors can only access your site at the preferred domain.
Changing the preferred version can cause technical issues if your site has already been up and running for a while. If you’ve any concerns, it’s worth enlisting the help of a developer to make sure everything goes smoothly.
Permalinks are basically the URL format for your posts and pages, and the “post name” option tends to be the most SEO-friendly because it helps:
- Make it immediately obvious what the page is about.
- Keep URLs short, which can prevent them from truncating in the search results.
However, if you’re already using a different permalink structure, then changing it can lead to broken pages. So if you make a change, you’ll want to crawl your website with a tool like Ahrefs’ Site Audit after the fact to check for 4XX errors:
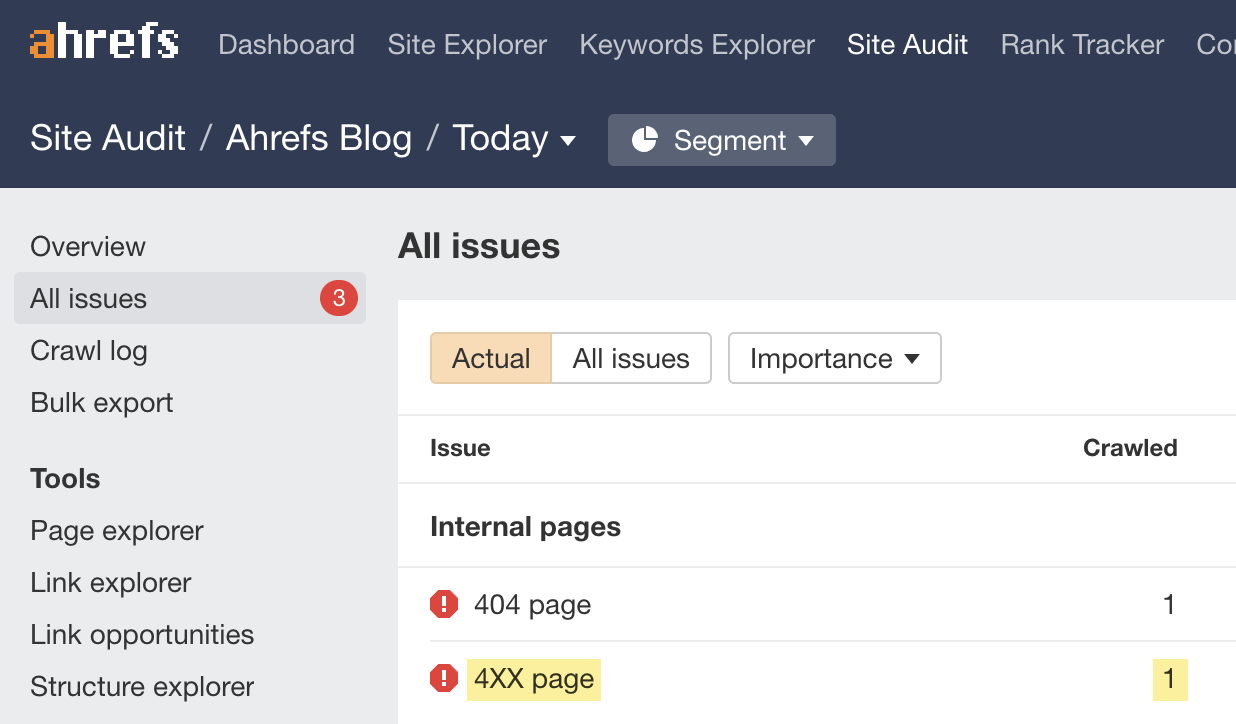
If there are any, you’ll want to use a WordPress plugin like Redirection to redirect the old URLs to the new ones.
Spammy blog comments are unlikely to cause penalties or any drastic SEO issues because they’re pretty much always nofollowed. But according to Google, they can still cause some SEO issues for a few reasons.
Luckily, WordPress makes it really easy to solve this issue once and for all by offering users the option to set all blog comments to require manual approval.
You can do this in Settings > Discussion > Comment must be manually approved:

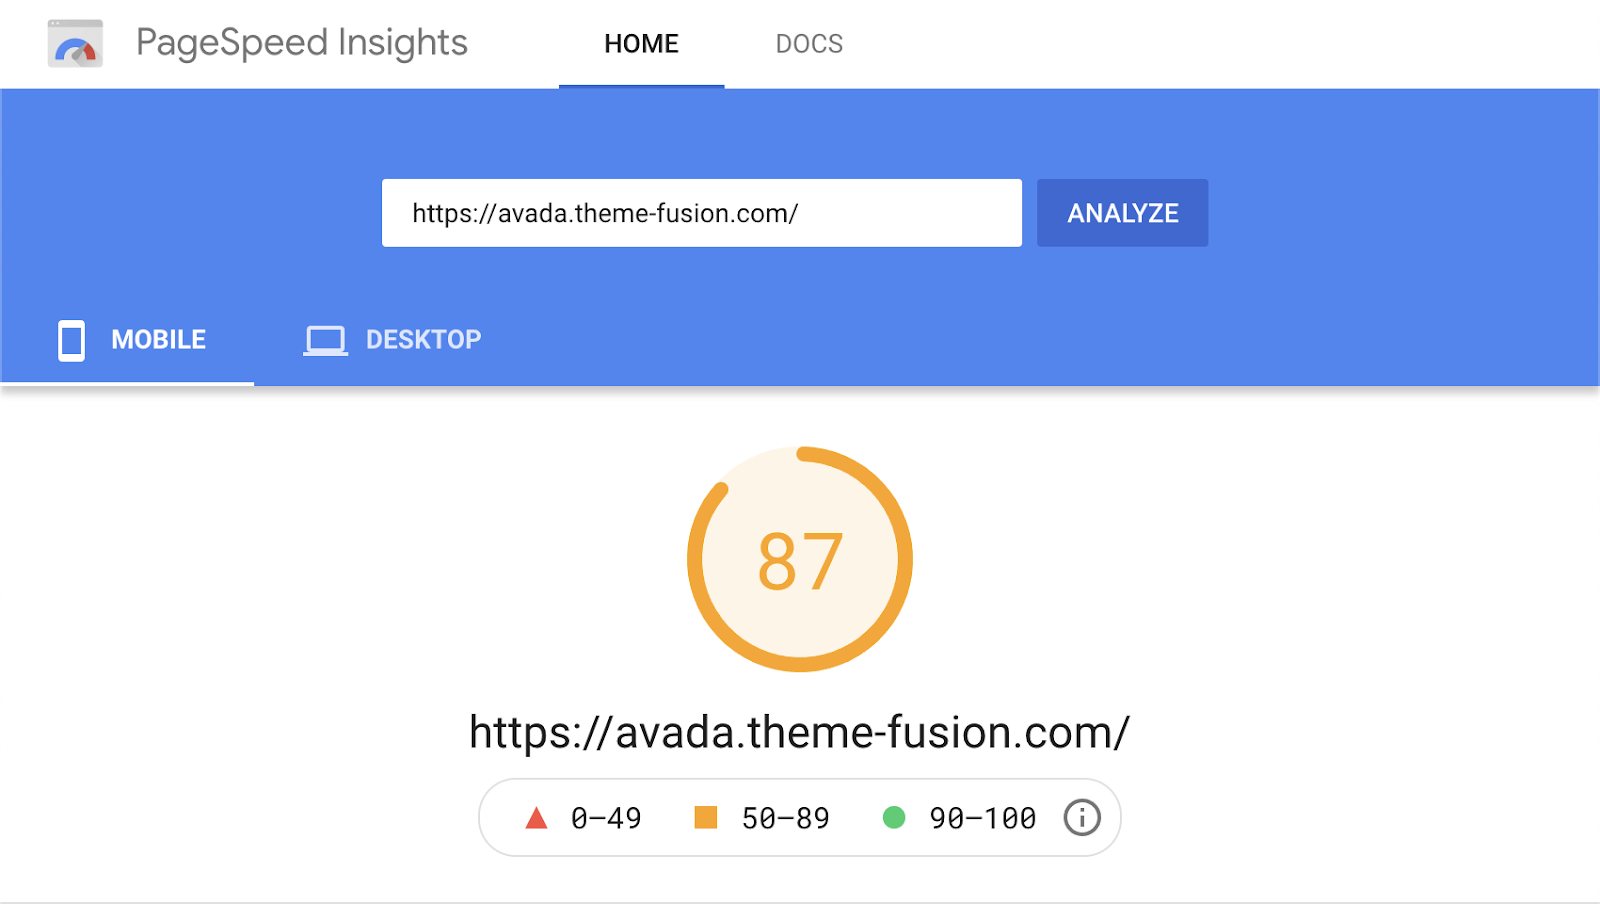
Pretty much all WordPress themes are responsive and mobile-friendly these days, so there’s not much to worry about there. What you really need to check when choosing a theme is its performance.
If the theme is bloated with unnecessary code and features, it’ll slow your website down. And that’s not good, given that page speed has been a Google ranking factor for over a decade.
So when choosing a theme, it’s worth reading through the description to see what’s included. If there’s a bunch of features you won’t use, it may not be the best choice for you.
You can also run the theme demo through PageSpeed Insights for a better sense of its performance.
If you already have a theme and its performance isn’t great, give tips #18–20 a shot and hire a developer to optimize it if it’s still slow.
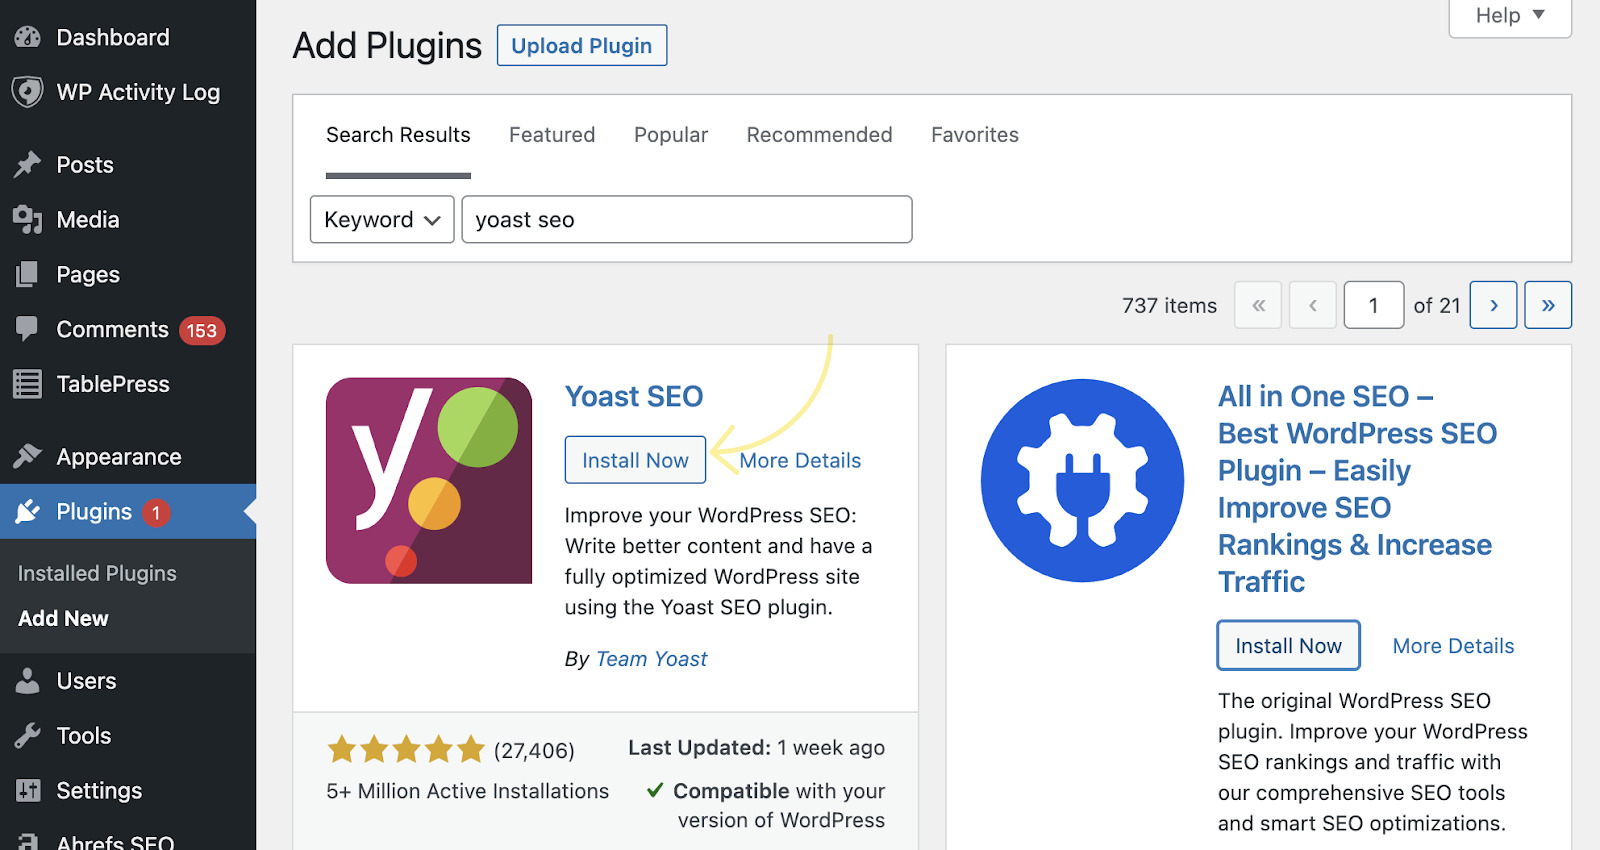
Extend the SEO functionality of WordPress and make it easier to optimize aspects of your site with an all-in-one SEO plugin. We use Yoast SEO, but there are plenty of other alternatives.
To install it, go to Plugins > Add New > Search for “Yoast SEO” > Click Activate > Click Install:
Most of the settings will be good out of the box, but we’ll adjust a few of them as we go.
Sitemaps list the important posts and pages on your site to help search engines discover them. Yoast SEO creates a sitemap for you, but you need to make sure the option is turned on.
To do that, go to SEO > General > Features > Toggle “XML sitemaps” on:

You should only allow Google to index pages that offer value to searchers. Tag pages and format-based archives rarely fall into this category, so it’s generally best practice to exclude them from indexing.
To do that, go to SEO > Search Appearance > Taxonomies > Toggle “Show Tags in search results?” off:
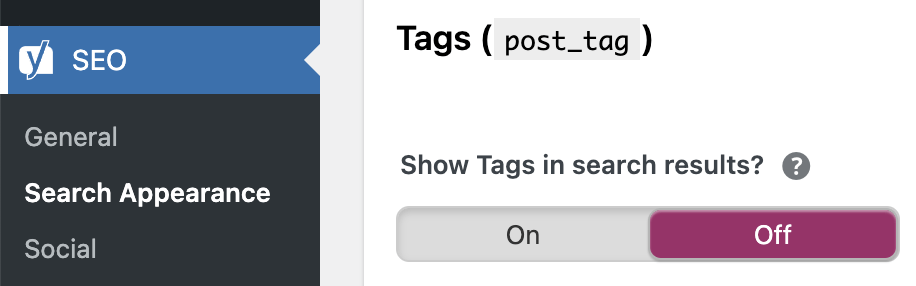
Do the same for format-based archives too.
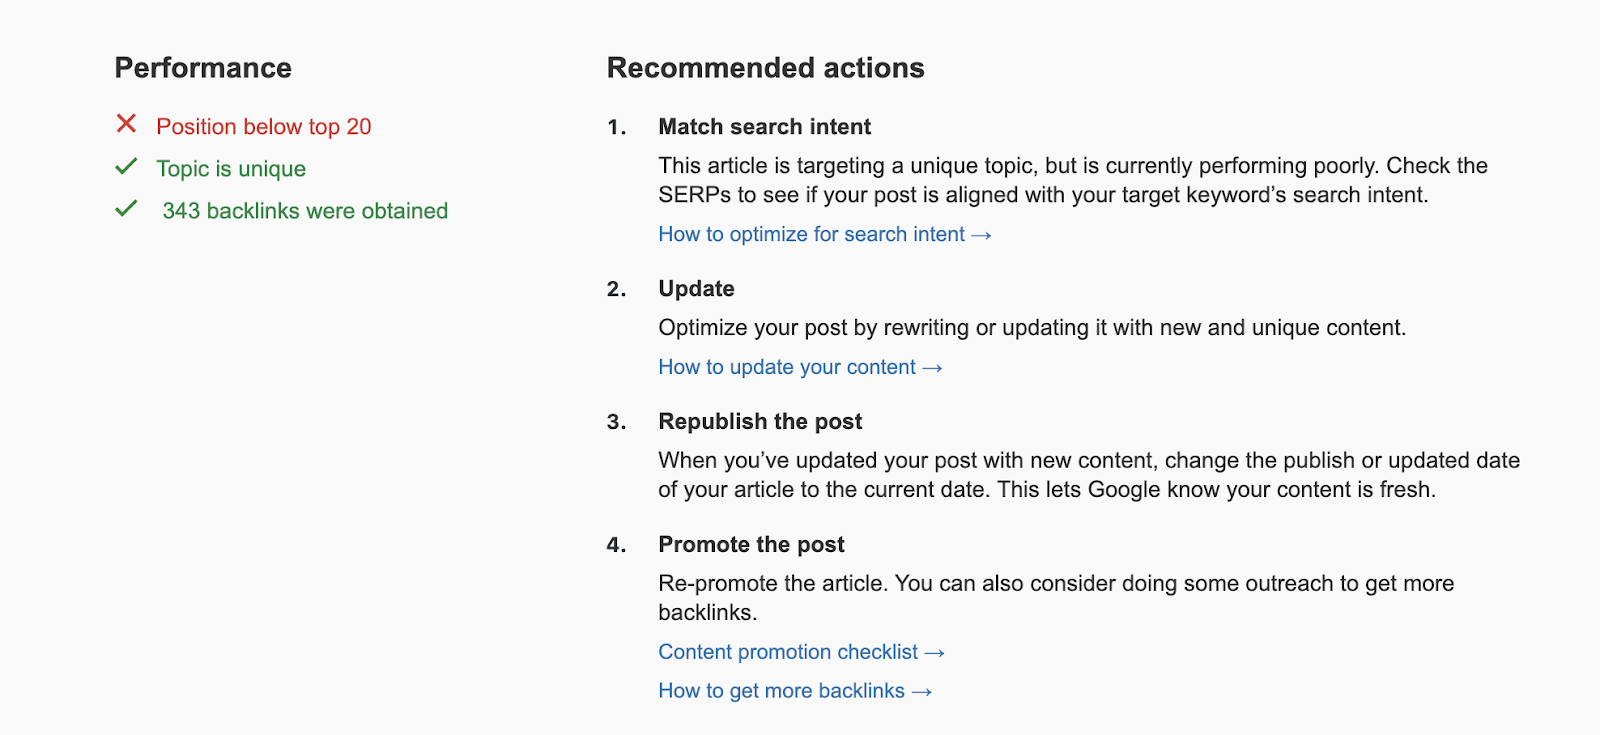
Our free WordPress SEO plugin audits and monitors content performance and gives recommendations on how to improve it. It also adds SEo keywords to WordPress so you can monitor everything about your content performance in one place.
For example, if the plugin spots that one of your pages is no longer ranking in the top three for its target keyword, it’ll tag it as “No longer well-performing” and give a personalized recommendation on how to improve based on your settings:
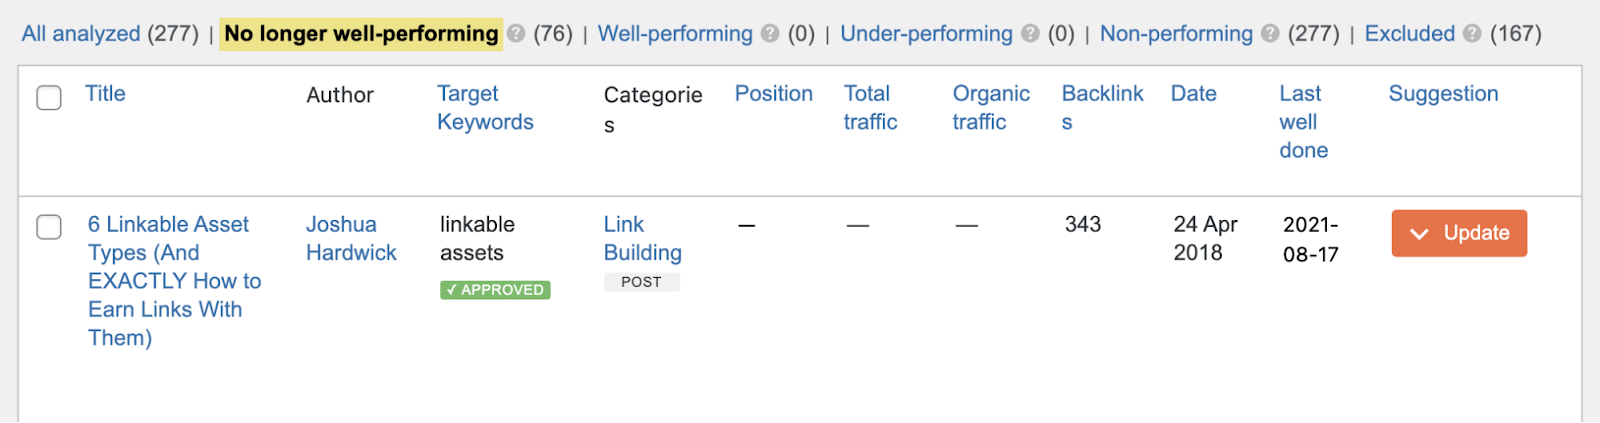
Here, it recommends that we update a post that no longer ranks. If we hit the suggestion caret, it gives advice on how to do that:
The next eight tips are content-related. Keep them in mind when adding posts and pages to your WordPress website.
Every page and post in WordPress needs a title, which you set here:

This title usually gets shown elsewhere on your WordPress website. For example, the title for this post shows up on our blog archive page:
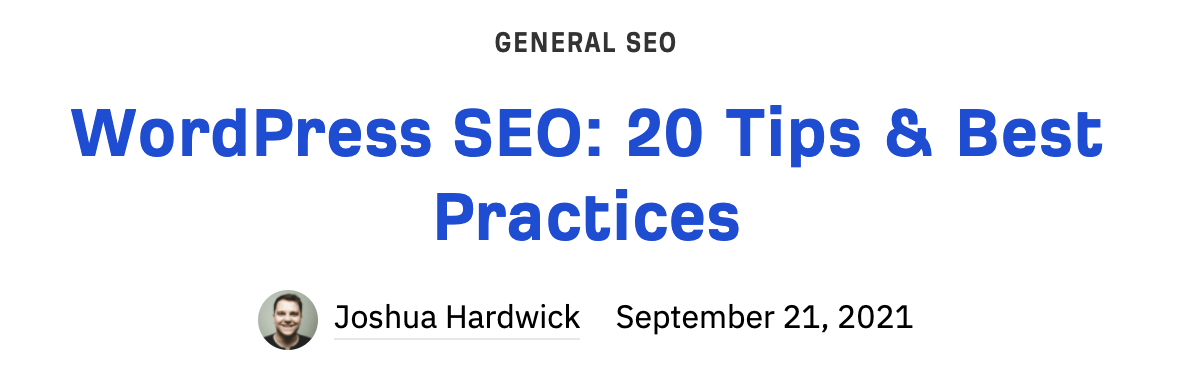
For that reason, it’s important that your title entices visitors to click through to your page while accurately describing what the page is about. In other words, the title should be clickworthy but not clickbait. It should also feature your main keyword so it’s a well-optimized SEO title.
If you’re struggling to write something that fits the bill, take inspiration from the SERP titles of the top-ranking pages for your target keyword, as these are often the same or similar to the page title. You can do that in Google, but it’s better to use our free SERP checker for more accurate, non-personalized results:
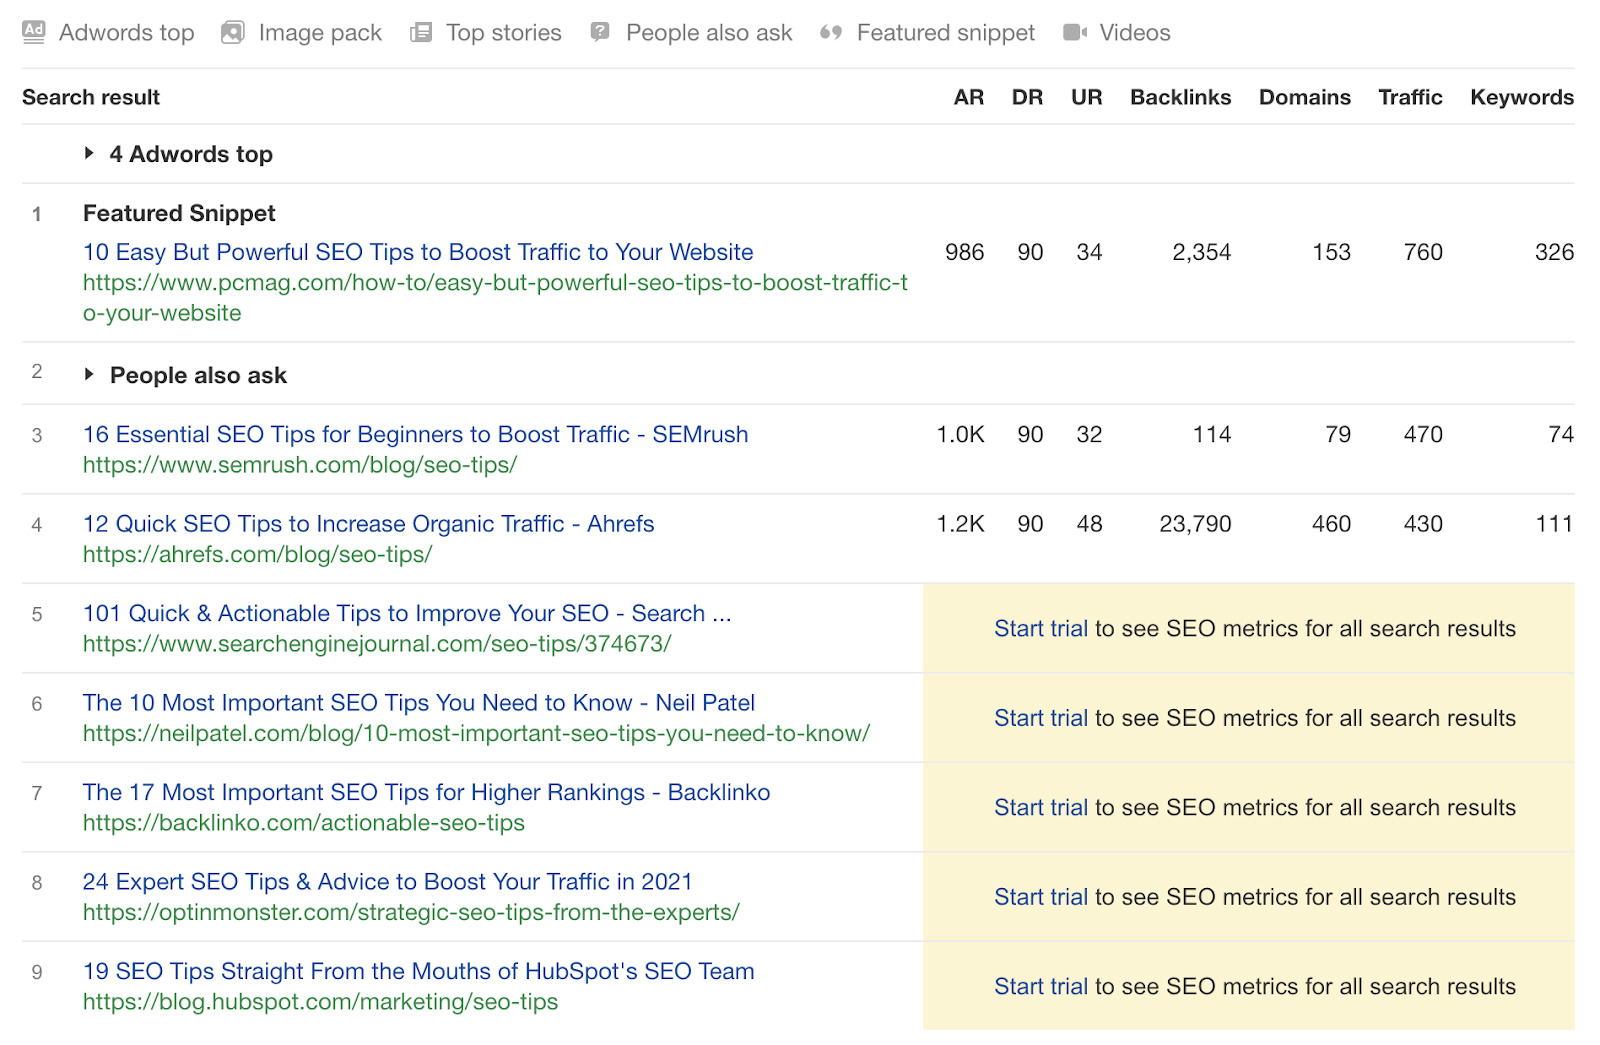
For example, you can see above that many of the pages ranking for “SEO tips” talk about boosting traffic or rankings in their SERP titles. So this is probably a good angle for a clickworthy title for this topic.
By default, WordPress sets the URL to the full title of the post or page. This is rarely ideal because it’s usually long, and long URLs tend to get truncated in the search results.
For a more SEO-friendly URL, click “Edit,” enter your primary keyword (or a close variation), and replace the spaces with dashes.

Headers create structure and help visitors and search engines to better understand the hierarchy of your content.
In WordPress, you can use the WYSIWYG editor to quickly and easily add relevant headers. Just hit the “Paragraph” dropdown, and you’ll see six header options:
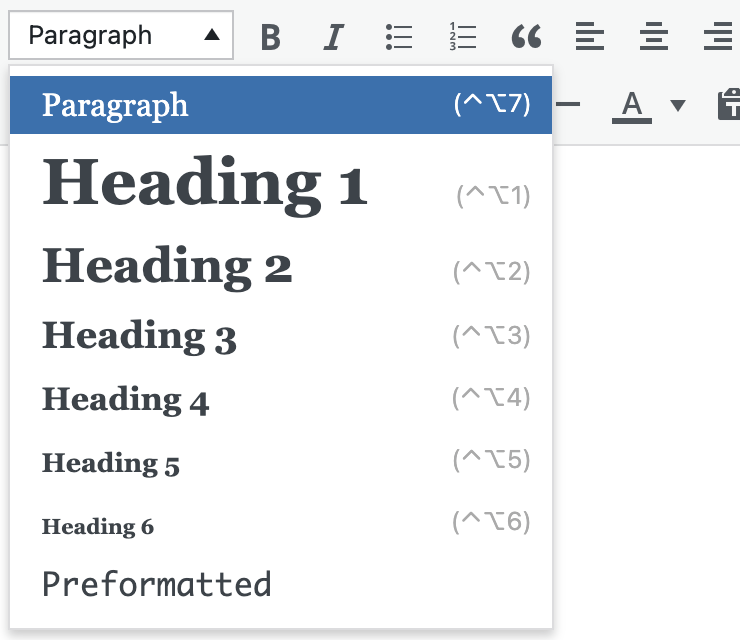
As most WordPress themes use the post title as the first header (H1), it’s best practice to use H2-H6 in the content itself.
Internal links point to other pages and posts on your website. They’re important for SEO because they help:
- Keep visitors on your site.
- Boost the “authority” of your other content and rank the content higher.
You can add internal links to posts and pages in WordPress using the WYSIWYG editor. Just highlight the text you want to use as the anchor, hit the “Insert/edit link” button, and paste in the URL of another page or post on your website.

If you’re not sure if and where to add internal links, sign up for a free Ahrefs Webmaster Tools (AWT) account, run a crawl in Site Audit, then go to the Link opportunities report to see relevant internal link suggestions:
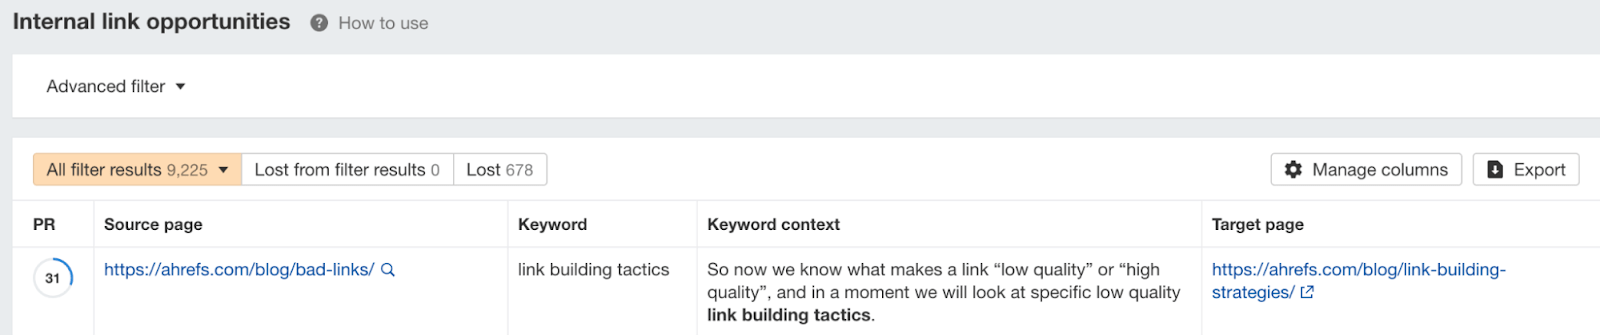
For example, you can see above that it recommends we internally link the phrase “link building tactics” in our guide to bad links to our list of link building strategies.
Alt text is important because it:
- Tells Google what images are about, which may help them rank higher on Google Images.
- Improves accessibility for visually impaired visitors using screen readers.
- Replaces the broken image on the page if the image breaks.
To add alt text in WordPress, fill in the “alt text” field when uploading an image:
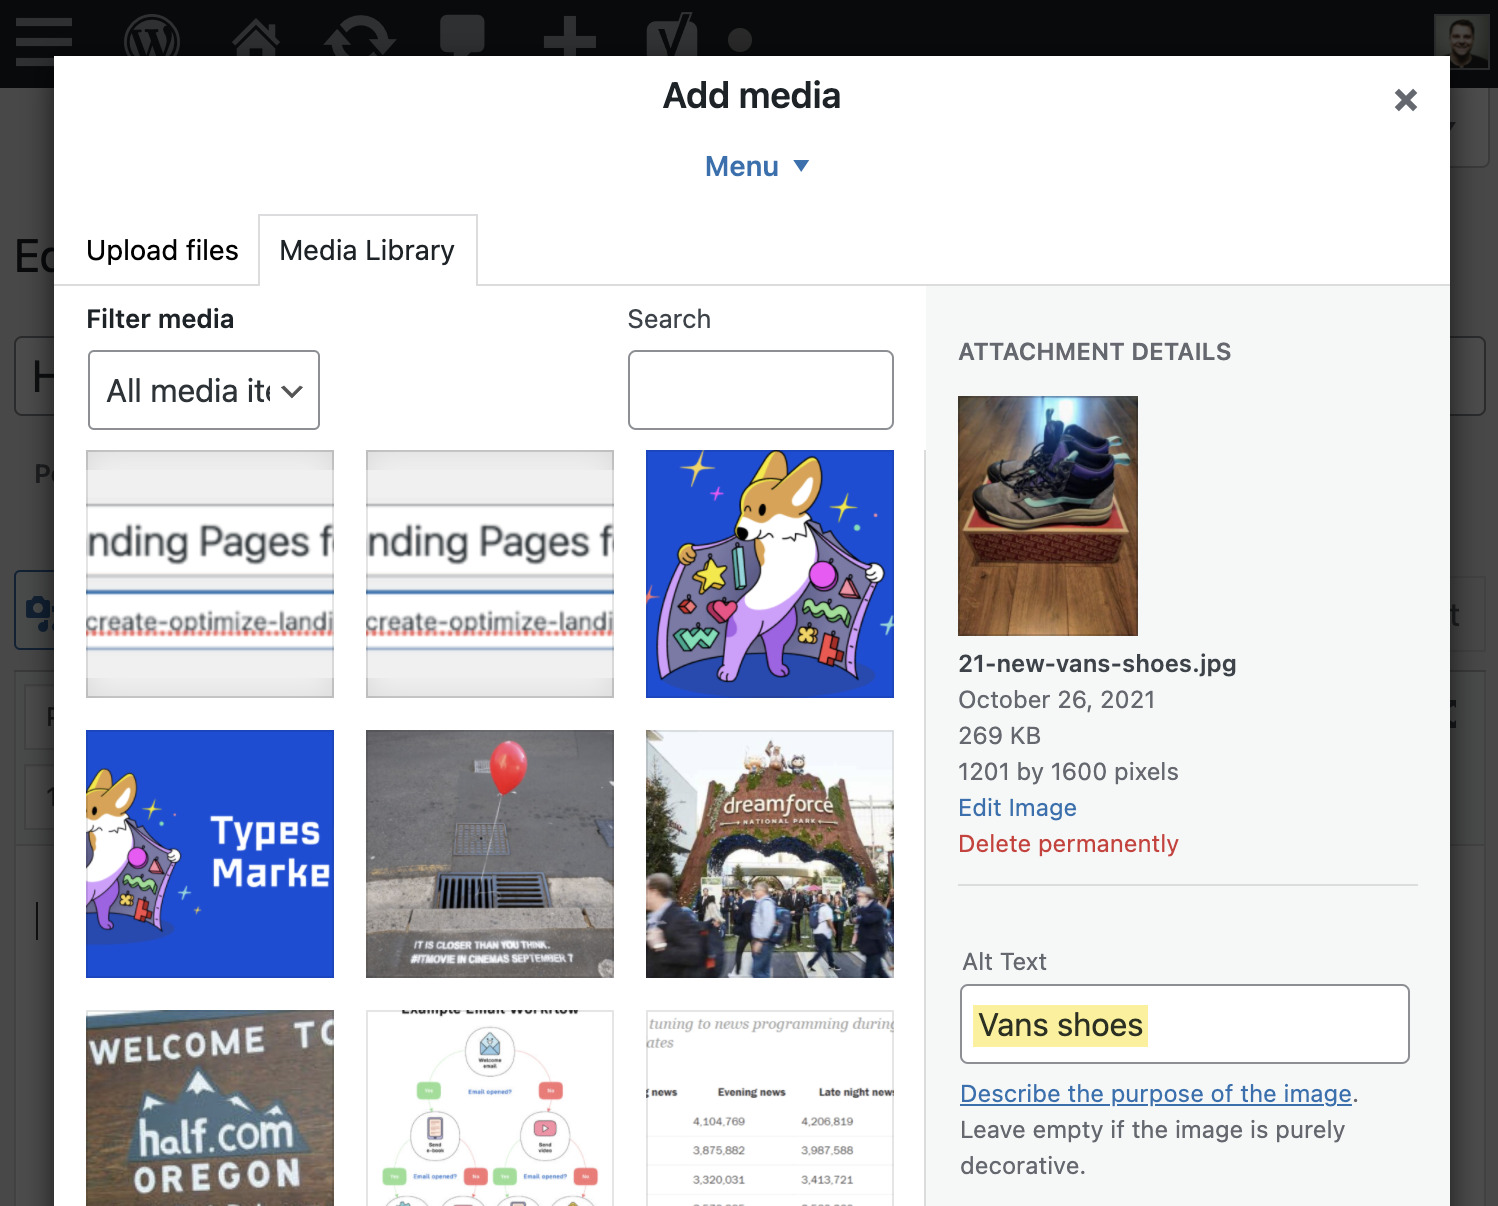
Just try to keep it short and sweet while being descriptive.
Recommended reading: Alt Text for SEO: How to Optimize Your Images
Google usually uses your title tag for the snippet in the search results.
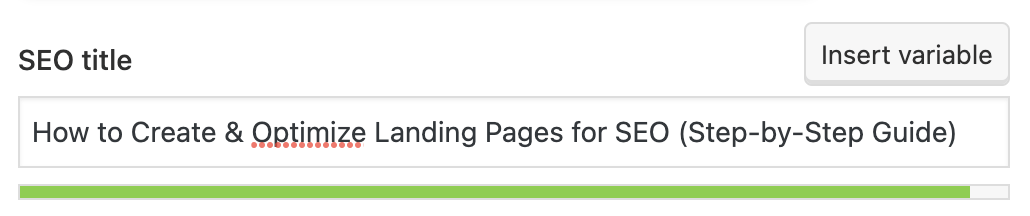
Yoast sets your title tag to your post or page title by default. This is often fine, as you should have already crafted an enticing post title. But sometimes it’s too long, so it’s worth pasting in the full title manually to make sure it’s not likely to truncate.
If it gets highlighted green, you’re all set. If it gets highlighted red, it’s too long.
You can usually solve the issue of a lengthy title tag by removing any superfluous information. Easy ways to do this include:
- Removing information in brackets.
- Removing unnecessary words.
- Rephrasing.
Meta descriptions aren’t a direct Google ranking factor, but Google often uses them for the search result snippet.
For that reason, it’s important to write a compelling meta description that supports your title and further entices people to click.
Here are a few tips for doing that:
- Double down on search intent
- Use an active voice
- Keep it under 120 characters
Recommended reading: How to Write the Perfect Meta Description
Assuming that you set your permalink structure to post name, your page and post URLs will look like this:
domain.com/post-name
domain.com/page-name
But with pages, you can create them with different levels using subfolders.
For example, let’s say you’re a digital marketing agency offering three different services: SEO, PPC, and social media marketing.
Here’s the best way to structure that:
- Create a “Services” landing page that lists the services you provide
- Create individual pages for each service you offer
- Link to each service page from your “Services” page
Here’s what your URL structure will look like by default:
domain.com/services/
domain.com/seo/
domain.com/ppc/
domain.com/social-media-marketing/
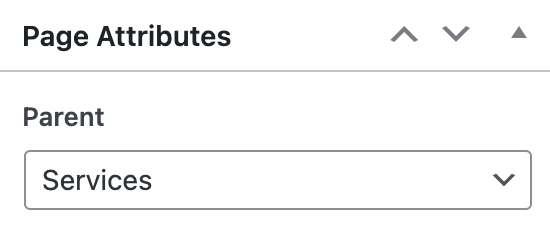
That looks OK. But it is better to nest the individual service pages under the “/services/” subfolder like this:
domain.com/services/
domain.com/services/seo/
domain.com/services/ppc/
domain.com/services/social-media-marketing/
That’s easy to do in WordPress. Just use the “Parent” dropdown on the page editor and choose the “Services” page.
The next three tactics are about page speed. Use these to speed up your website and improve its performance. Note that we haven’t covered every optimization you can make here, as page speed is a complex topic. So if you want to delve deeper into this side of things, read our full guide to speeding up your WordPress website.
WP Rocket describes itself as a web performance plugin that boosts your page speed. The beauty of the plugin is that it makes a bunch of useful optimizations out of the box, including browser and server caching.
Here’s what caching does in a nutshell:
- Browser caching – Saves common files on visitors’ hard drives so they don’t have to keep re-downloading them on repeat visits.
- Server caching – Saves static versions of your webpages on your server so they’re ready and waiting whenever a visitor requests them.
This is not a free plugin but, in my opinion, it’s well worth the $49 price tag if you have the budget. If you’re looking for a free plugin that does something similar in terms of caching, try one of the many other caching plugins available.
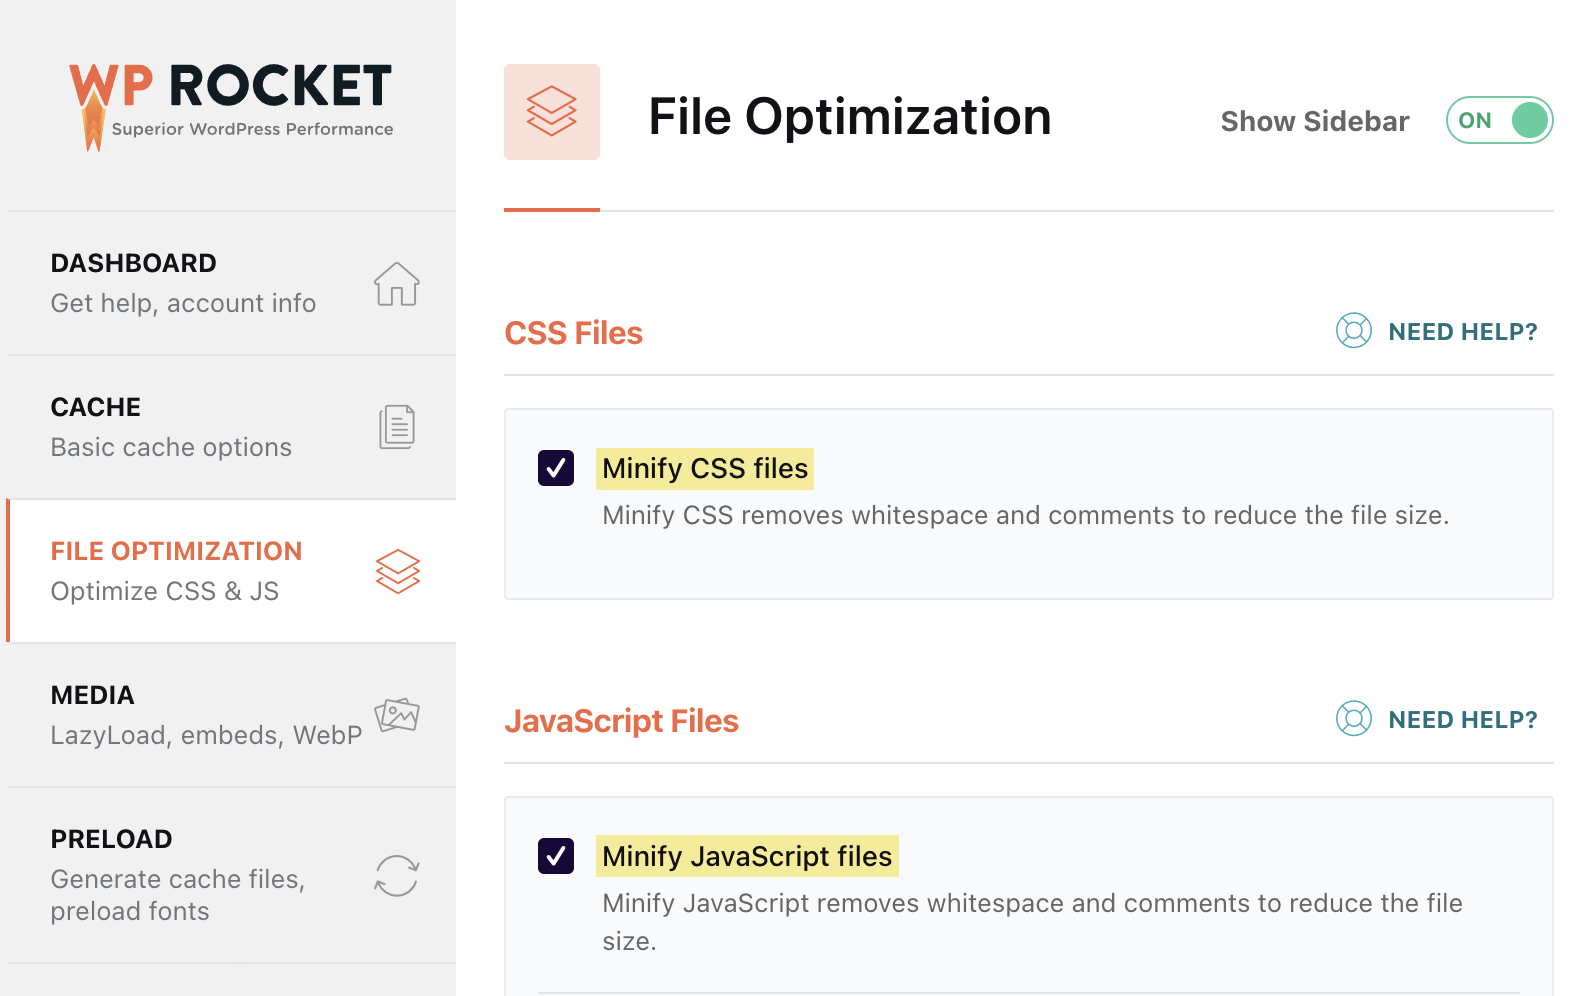
Minification removes unnecessary white space from your code to reduce file sizes.
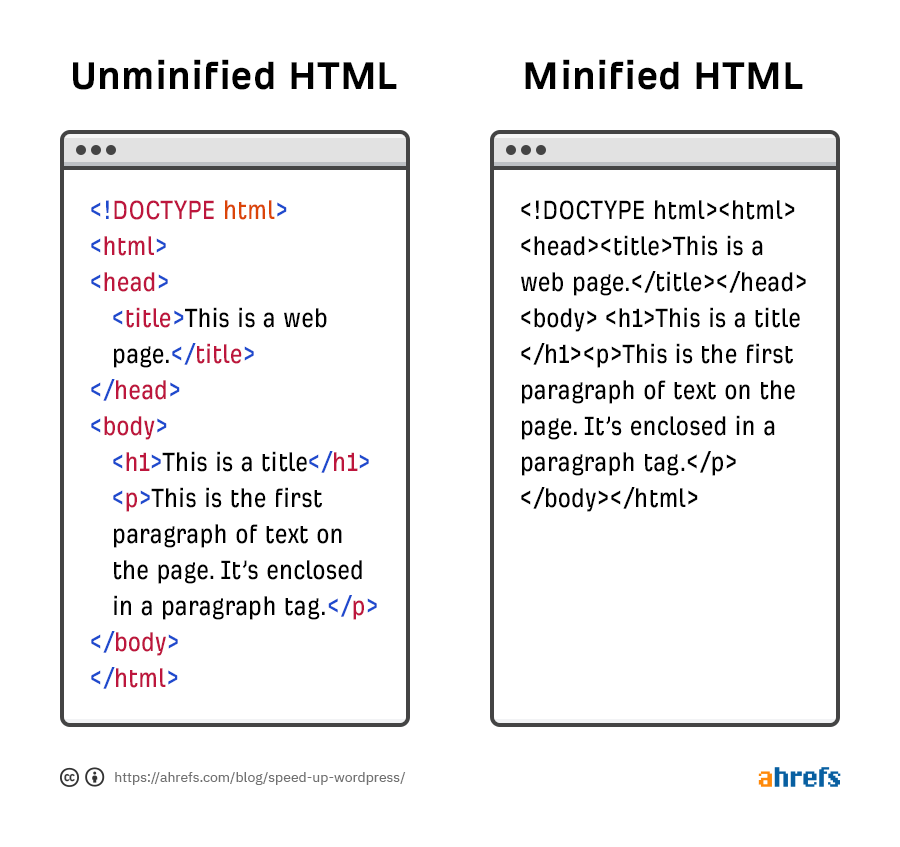
It’s simple enough to enable minification if you’re using WP Rocket. Just head to the File Optimization settings and check the options to “Minify CSS files” and “Minify JavaScript files.”
If you’re not using WP Rocket, give Autoptimize a shot (it’s free).
Enabling minification can lead to features breaking in some instances. So it’s always best to test how this affects your website in a staging environment before deploying live.
ShortPixel automatically compresses and optimizes the images you upload to WordPress. This makes the image files smaller, reduces strain on your server, and makes things load faster for your visitors.
To get started, install the plugin, activate it, then enter your API key in the settings.
Note that ShortPixel is a freemium plugin. So if you’re compressing more than 100 images per month, you’ll need to buy some credits or sign up for a paid plan. This only costs a few dollars and is well worth the money, in my opinion.
If you do have the budget for a paid plan, it’s also worth hitting the option to bulk optimize the images already uploaded to WordPress.
Final thoughts on these WordPress SEO best practices
WordPress is flexible, easy to use, and provides a good base for SEO. But it can only get you so far because it’s just a CMS. If you’re serious about ranking on Google, there are a few more things you’ll need to do.
Ready for better rankings? Read our step-by-step guide to ranking high on Google.
Got questions about WordPress SEO? Ping me on Twitter.