
Every blog post is different, but most aren’t that different.
Think about the blog posts you’ve read. Chances are they weren’t a million miles apart in terms of format. You probably just didn’t pay much attention because you were focused on the content.
For bloggers, this is good news. It means that no matter what you’re writing about, templates can make life easier.
In this post, we’ll cover four blog post templates to help you write great content faster, and when to use them.
List posts, also known as listicles, are lists of tips, tools, techniques, myths, mistakes—anything that makes sense as a list.
Examples
- 23 Blogging Tips for Beginners
- 13 Proven Tactics to Increase Your Blog Traffic
- 86 Blog Post Ideas (With Successful Examples)
- 29 Awesome SEO Blogs to Follow (Graded and Ranked)
- 10 Google Ranking Factors You Shouldn’t Ignore
Grab the free blog post template
Download our free blog outline for Google Docs or Word. It’s got a step-by-step guide plus bonus advice for helping you write a list post that actually stands out.
What kind of content is this template best for?
List posts are best for non-chronological information. In other words, anything that doesn’t need to be in a specific order.
For example, take a look at our list of ways to find someone’s email address:
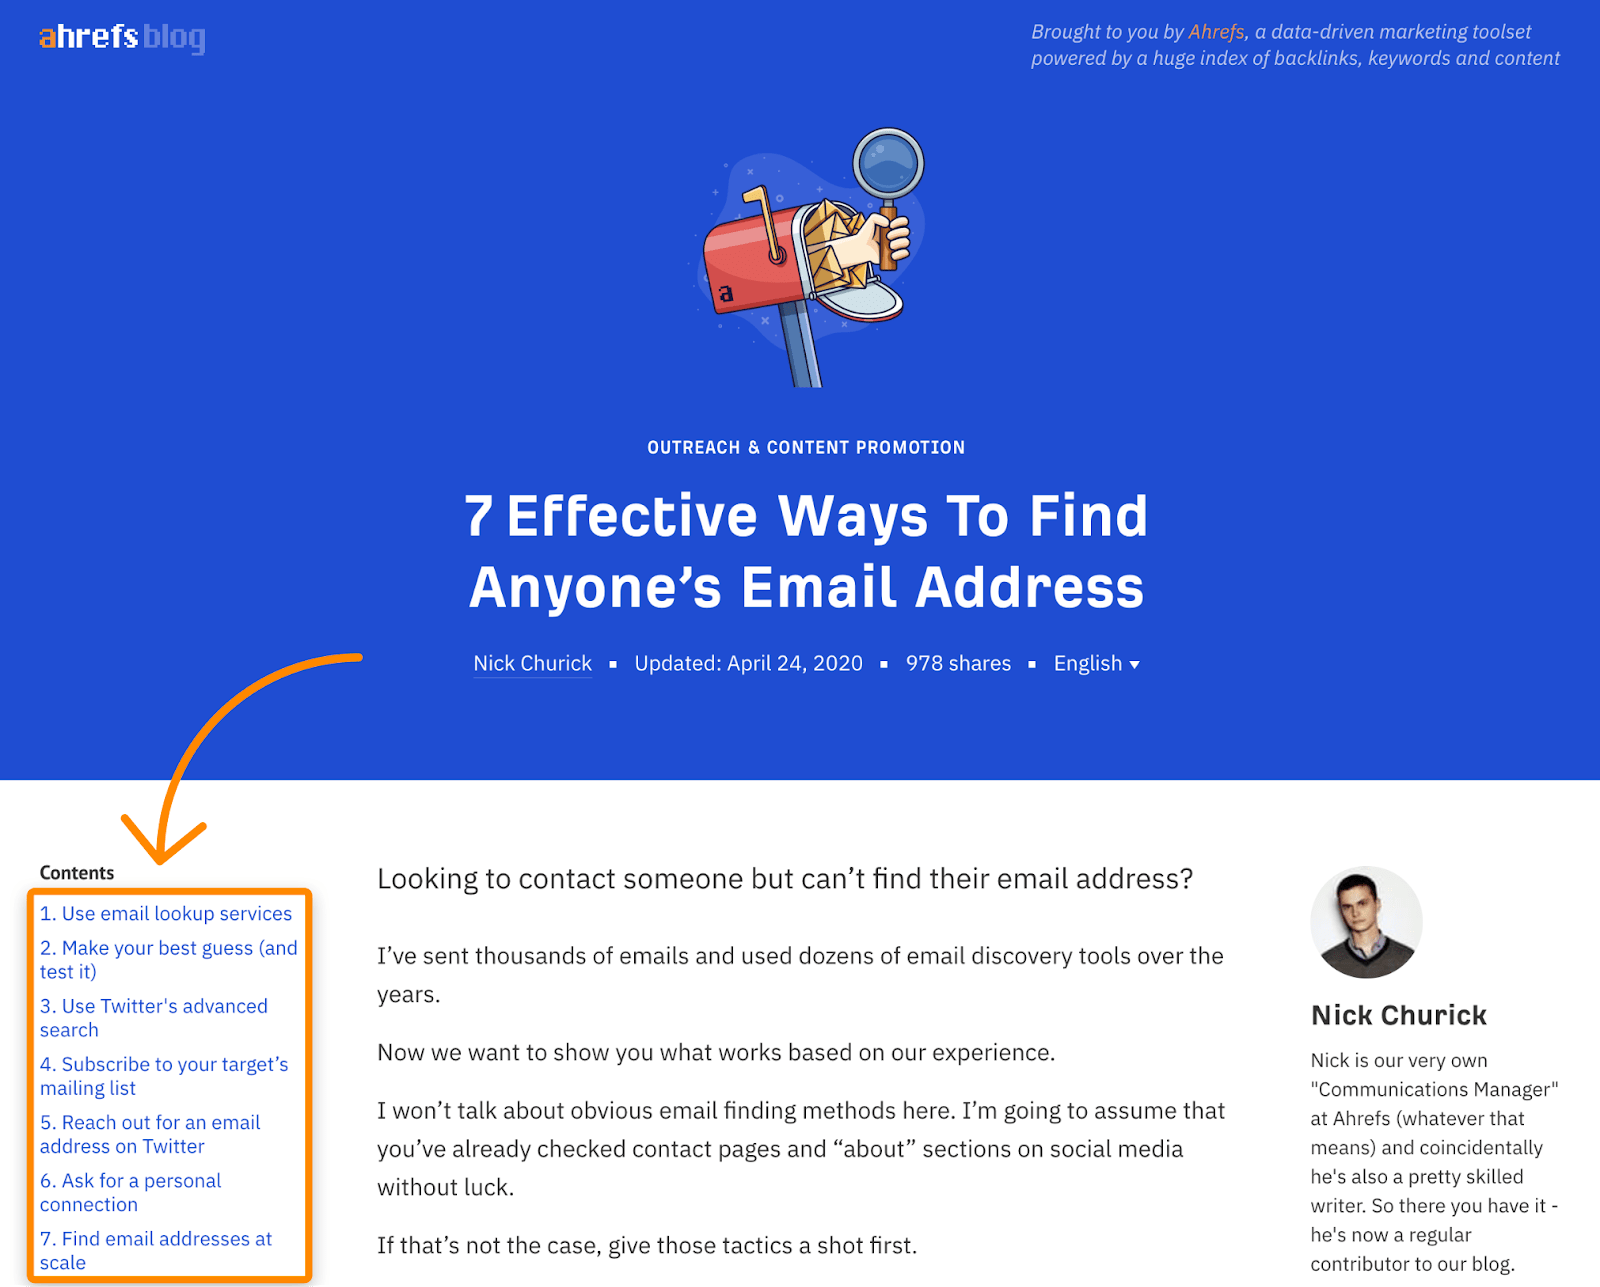
You could rearrange any of these items on the list and the post would still make sense. If that’s not the case for what you want to share, then this isn’t the right template to use.
How to use this template
Follow the steps below.
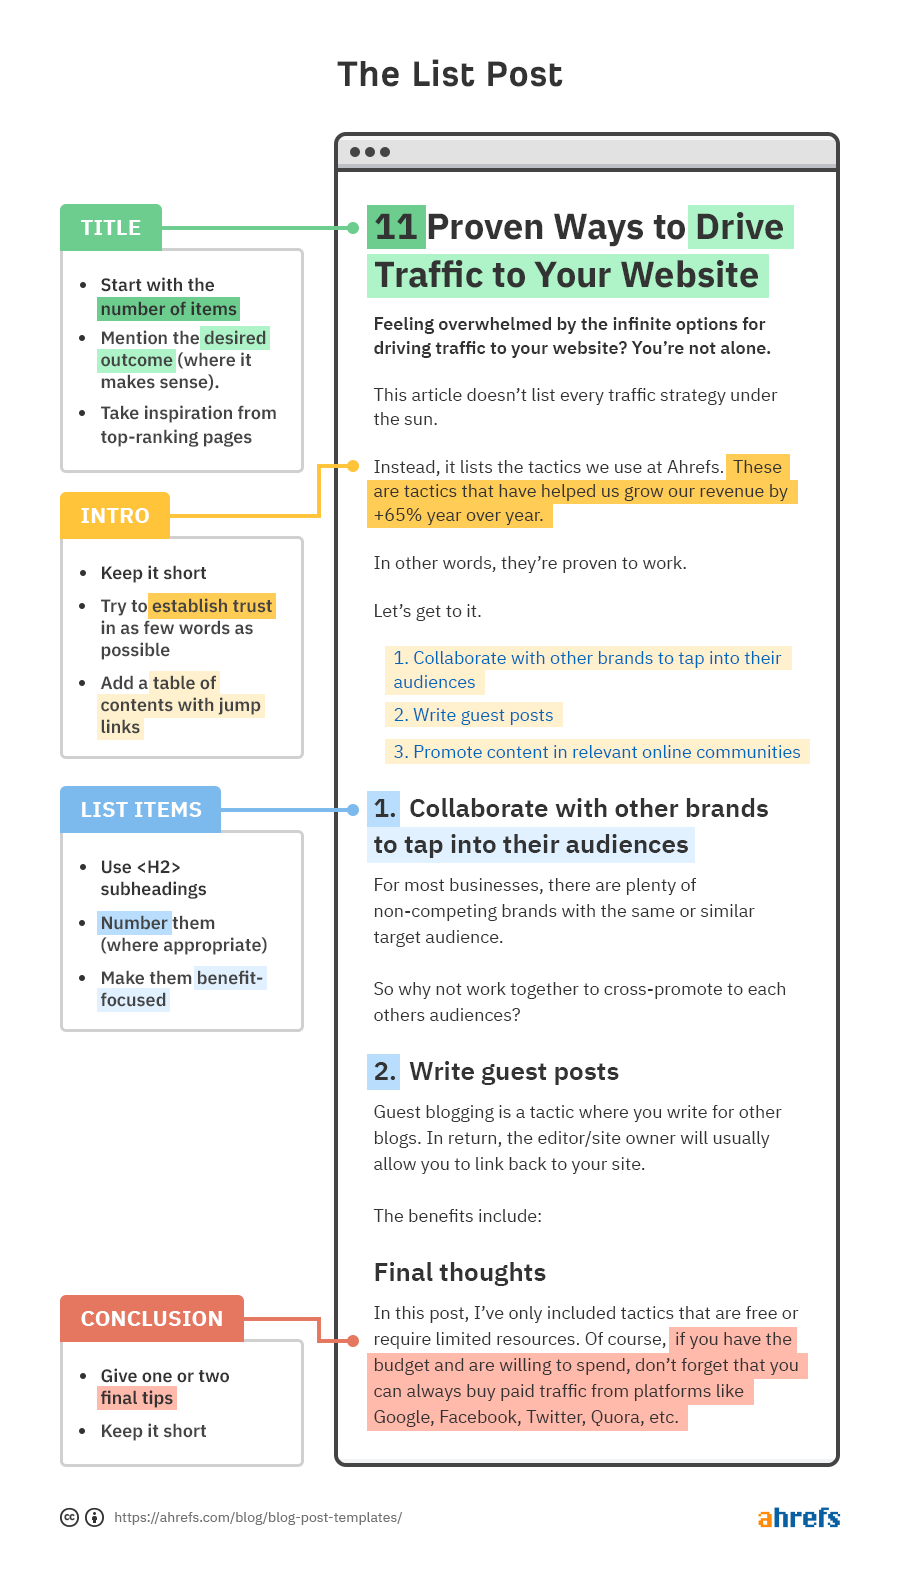
a. Create a numbered title
Use one of these templates and fill in the blanks.
- XX Ways to [Desired Outcome]
- XX [Topic] Tips
- XX [Type] Tools
- XX Reasons Why [Problem]
- XX [Topic] Techniques
- XX [Products] For [Audience]
Just make sure it’s readable and aligns with the content that you’ll be sharing in your blog post. If your post is about weight loss tips, don’t call it “13 Reasons Why You’re Not Losing Weight.”
Beyond that, feel free to make your title more compelling by adding a benefit or including relevant power words. For example:
10 Ways to Get More YouTube Views
→
10 Easy Ways to Get More YouTube Views (Even If You Have Zero Subscribers)
If you’re struggling, look to the titles of the top-ranking pages for inspiration.
Recommended reading: How to Craft the Perfect SEO Title Tag (Our 4‑Step Process)
b. Write a short intro
Most people skim list posts. That’s the beauty of this format; it’s non-chronological. If one of the tips on the list doesn’t appeal, the reader can keep scrolling until they see one that piques their interest.
For that reason, there’s no point in writing a long introduction. You just want to do two things:
- Establish trust in as few words as possible.
- Include a linked table of contents.
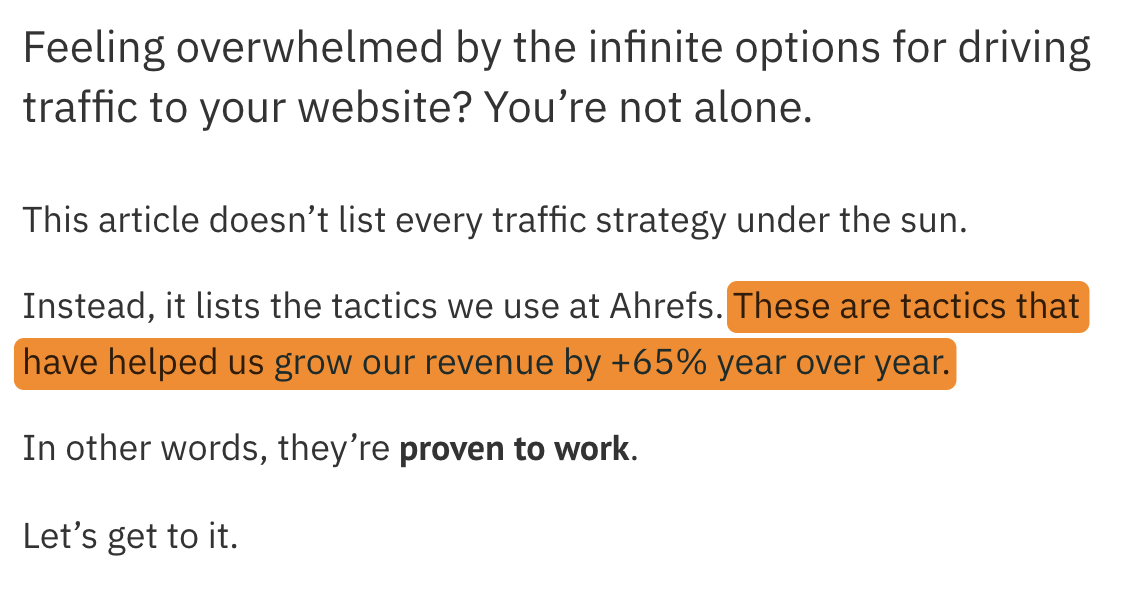
Here’s a good example of establishing trust from our blog:
Adding jump links below this just makes life easier for the reader. They don’t have to scroll through the entire list to understand what they’ll learn. They can just skim the contents and jump straight to the tip that interests them.
Learn how to add jump links in this post.
c. Use subheadings for list items
Every list item needs a subheading. Use the <h2> heading level for each one.
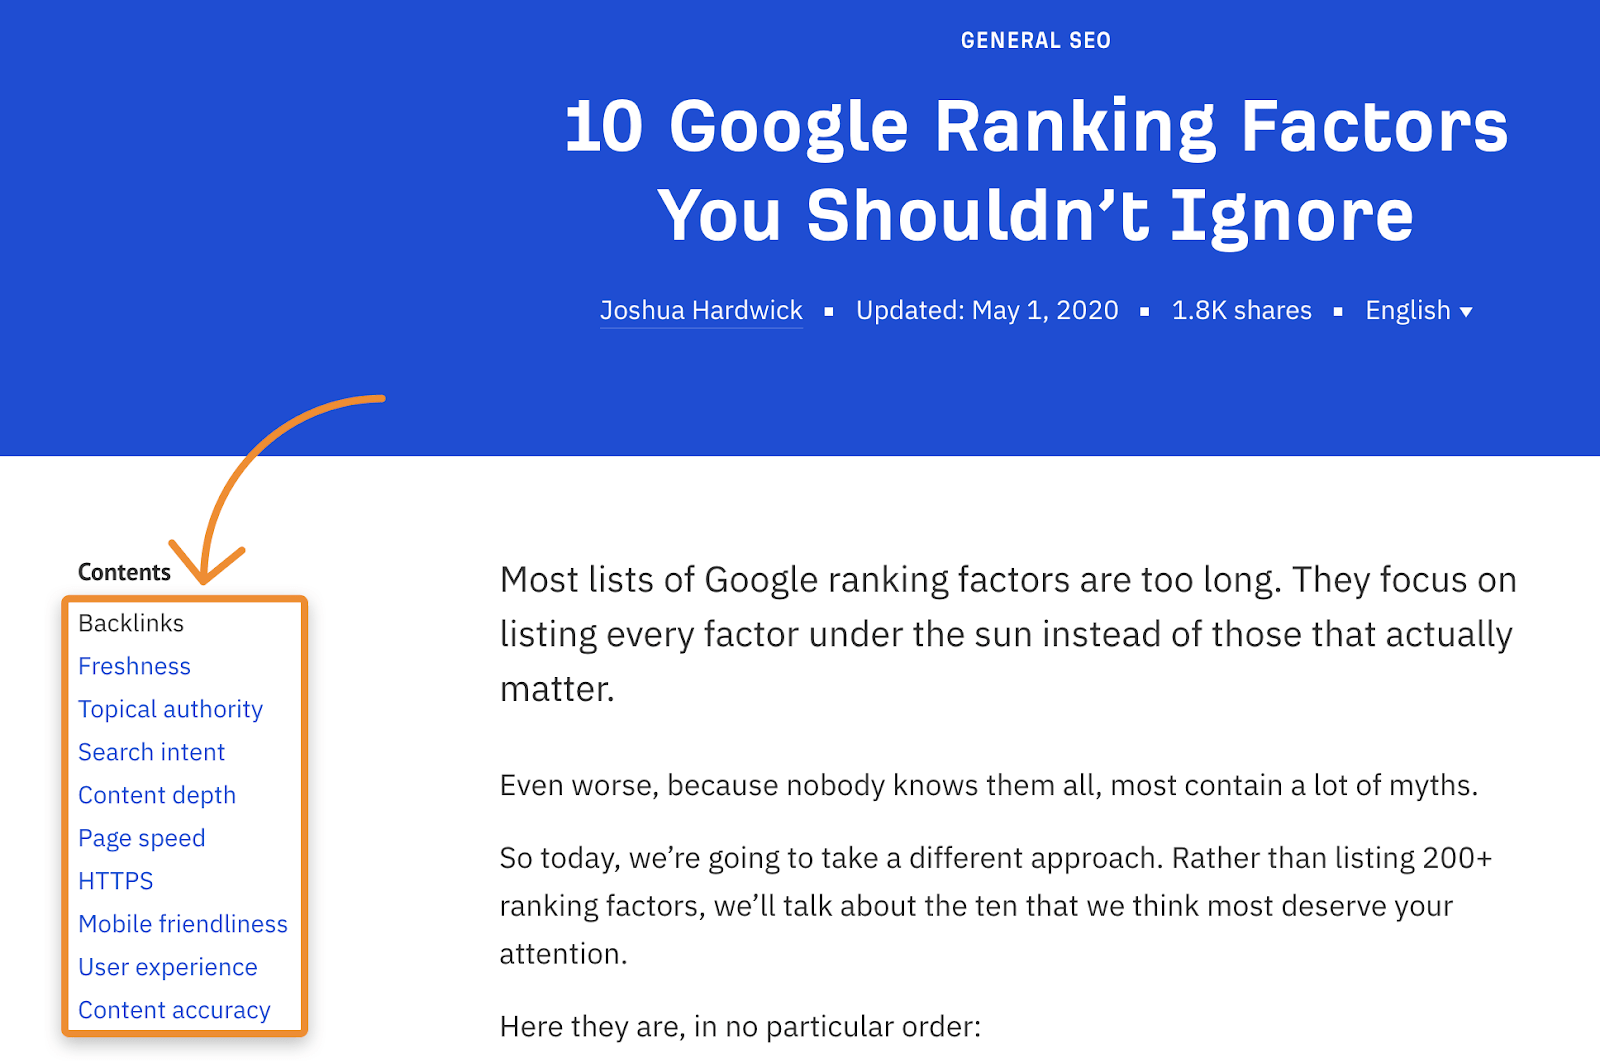
Usually, these will be numbered, but they don’t have to be.
For instance, in our list of Google ranking factors, we chose not to use numbers because all the points are of equal importance.
Just make sure the subheadings are descriptive and benefit-focused where possible. This will entice folks to read each point. For example, in a list of weight loss tips, “5. Eat spicy foods to boost your body’s calorie-burning abilities” is probably better than simply “5. Eat spicy foods.”
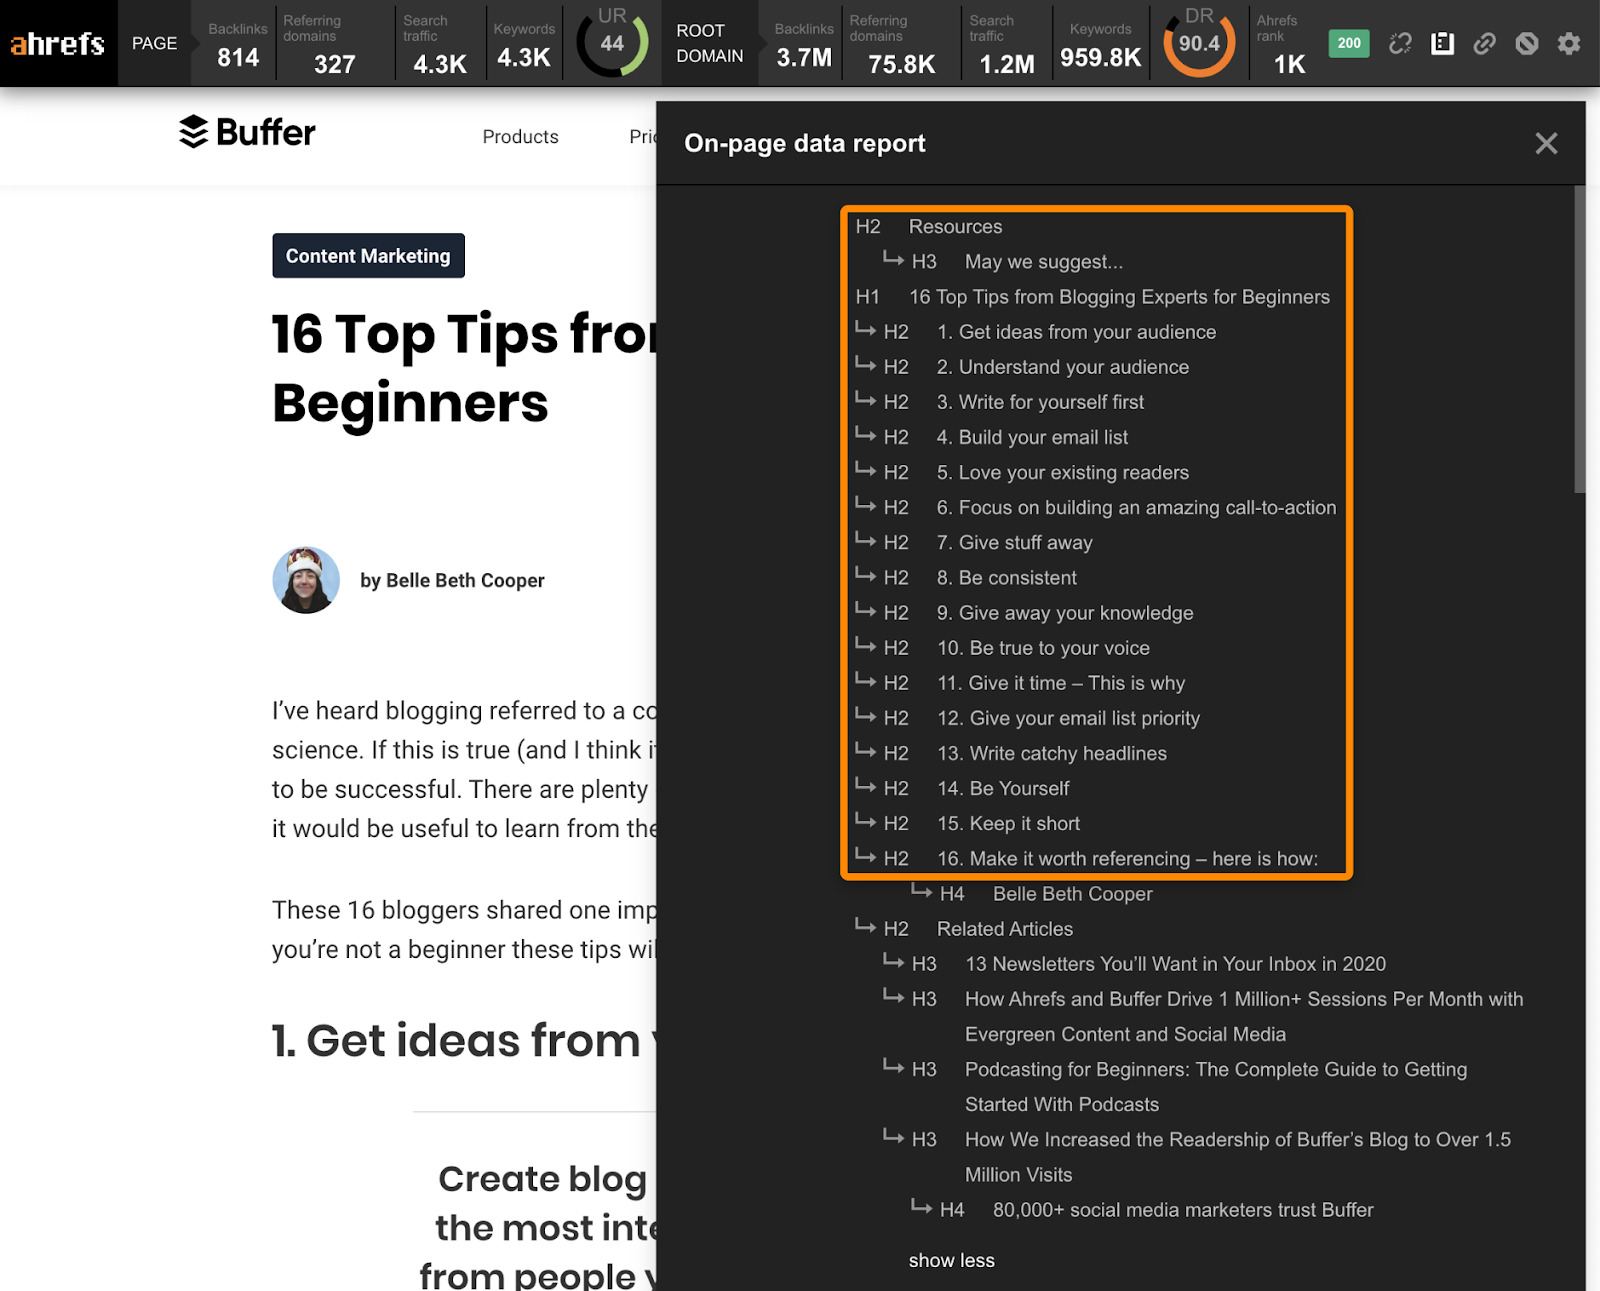
If you’re not sure what points to include on your list, skim the subheadings in other top-ranking posts for inspiration.
You can use the on-page report in Ahrefs’ SEO toolbar to see these at a glance.
d. Conclude with a final tip
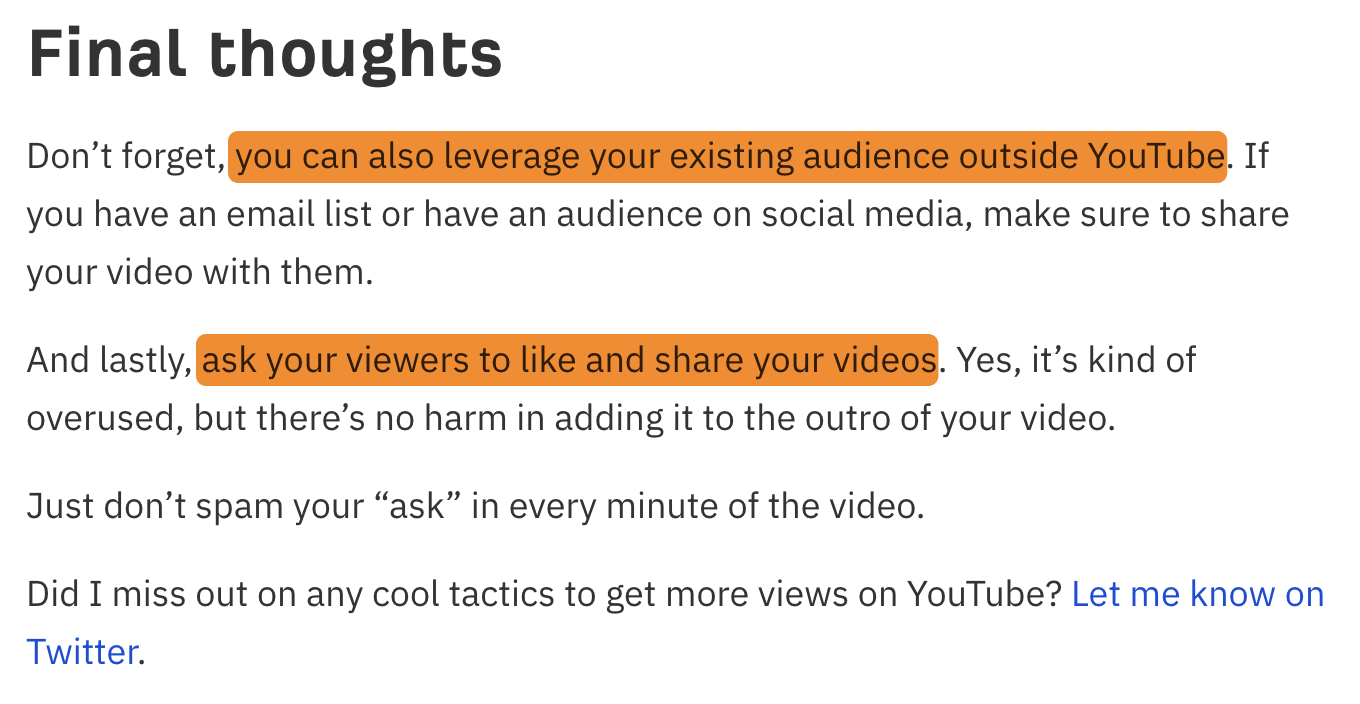
Every blog post deserves a conclusion. There are lots of ways to do this, but one approach that works well for list posts is to give one or two final tips.
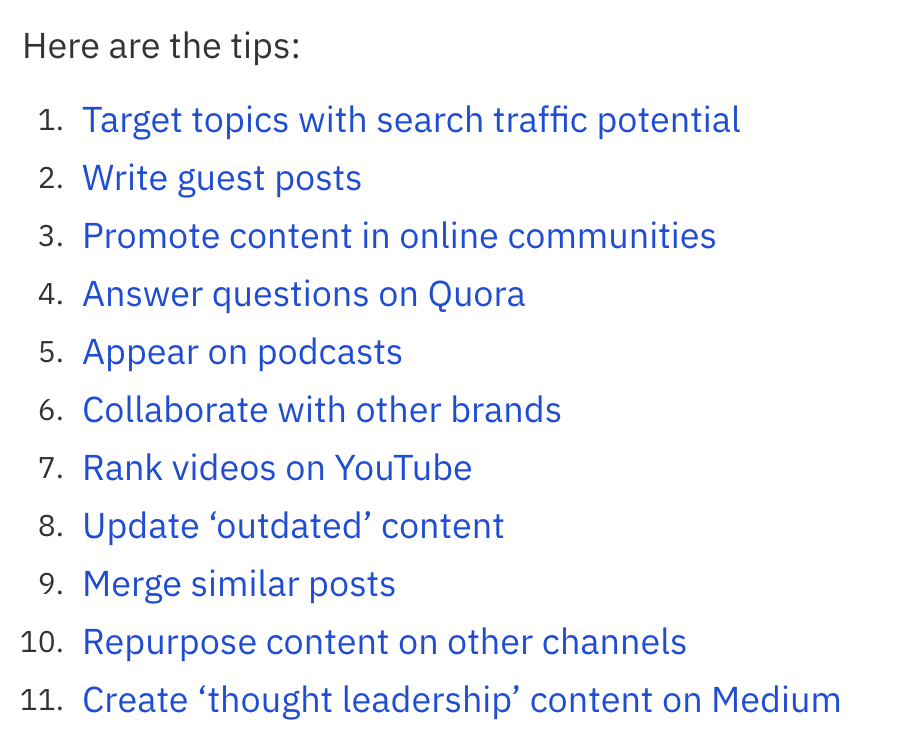
Here’s an example from our list of ways to get more views on YouTube:
Competitor comparison posts pit two similar products or services against each other, weighing up the relative pros and cons.
You’ll have come across them in the process of buying something online – unless you’re that rare breed who hands over their money to the first brand they find on Amazon, and waits to see what arrives in the post (if so, you are braver than I!)
Given that they’re bottom of the funnel, competitor comparison keywords have incredibly strong conversion potential…
That’s why you shouldn’t just stop at creating comparison posts for “your brand vs competitor” keywords.
Jump on “competitor vs competitor” or “partner vs partner” keywords, and insert your brand into new periphery conversations.
Here are some brands who’ve done that well:
- Notion Vs. OneNote: A Note-Taking App Comparison
- Dropbox Sign (Formerly HelloSign) vs DocuSign: Which is best in 2024?
- Trello vs. Asana: Which PM tool is better? [2024]
Grab this free blog template
Get the “Competitor comparison + your brand” template for your blog.
This is a free blog post template for Google Docs/Word that includes a “write with me” style outline, plus additional tips you won’t see below.
What kind of content is this template best for?
If you’re writing about products or services that often get compared by potential buyers, this template is ideal. It works well for:
- Software comparisons (e.g., project management tools, SEO platforms)
- Consumer product face-offs (e.g., smartphone models, streaming services)
- Service provider evaluations (e.g., hosting companies, online course platforms)
How to use this blog template
a. Create a “Competitor 1 vs Competitor 2” title
Use one of these formats:
- Choosing Between Competitor 1 and Competitor 2? Read This First
- Competitor 1 vs Competitor 2: Which One Is Better?
- Competitor 1 vs Competitor 2: The Ultimate Comparison (Current Year)
b. Write an unbiased intro
Briefly introduce both competitors and explain why readers might be comparing them. Don’t show bias towards either brand at this stage.
The intro is also a chance to mention your brand, and plant the seed of it being a worthy add-on or alternative.
Round off by telling readers what they’ll get out of the post – focus on the benefits rather than the details. Your contents block is coming up next anyway, so they’ll get a preview of what’s in store.
c. Use subheadings for key comparisons
Break down your comparison into categories, using subheadings like:
- Feature comparison
- Pricing
- User experience
- Customer support
- Use cases
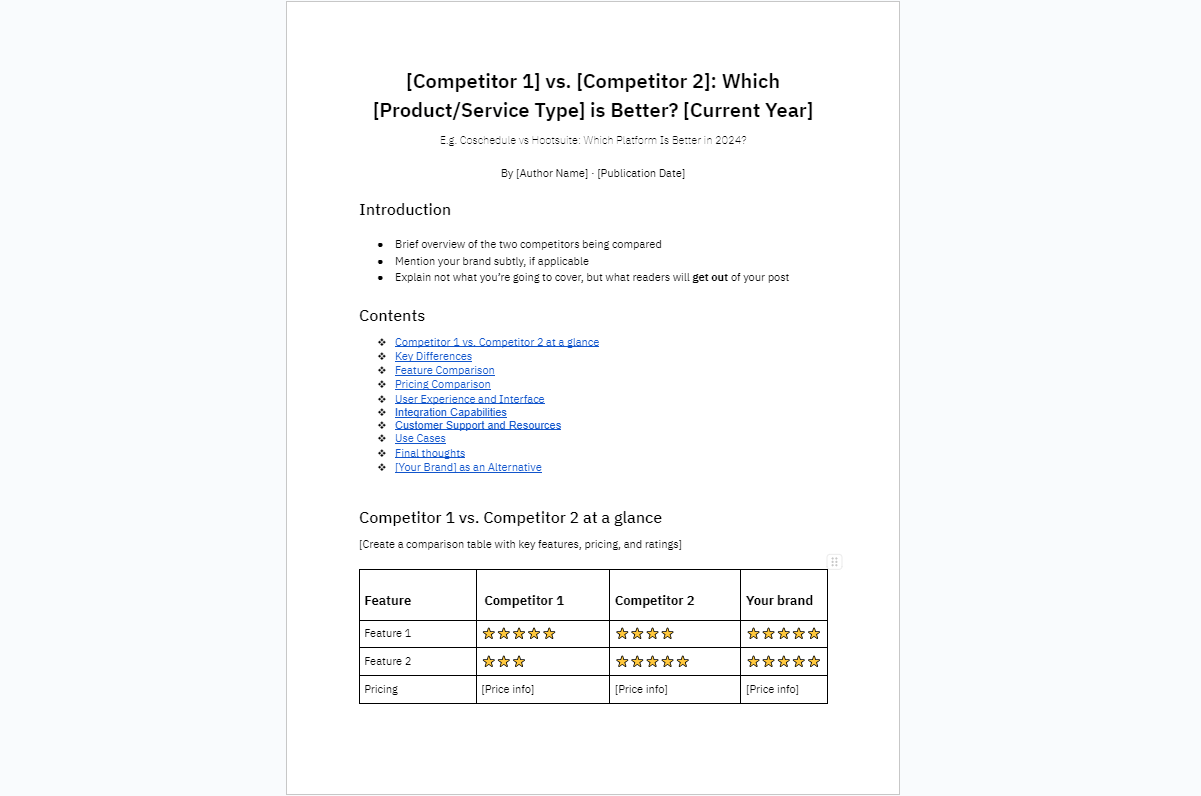
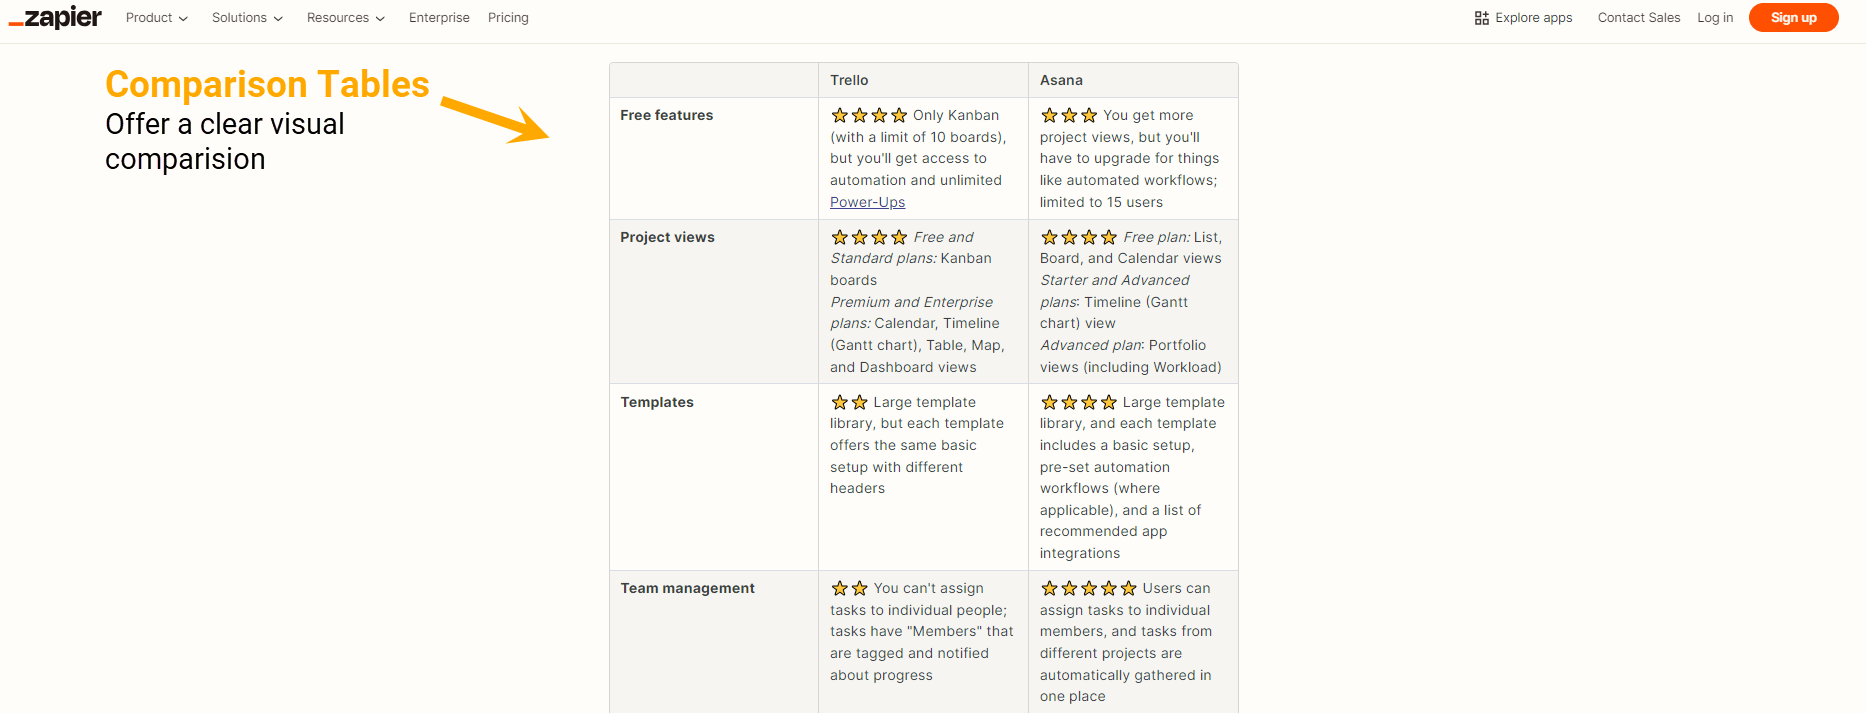
d. Create comparison tables
Readers will often scroll straight to table comparisons when they’re scanning these kinds of articles.
Make sure yours offers a clear visual comparison of features, pricing tiers, and anything else you can quantify.
Depending on how subtle vs. salesy you want to be, you can also add in your brand as a third option here.
e. Highlight the key differences
Help readers understand each competitors’ USPs and key differences. Why do customers choose competitor 1 over competitor 2 and vice versa?
Is there a key thing both competitors are missing?
This is a nice set up for a callback later on in the article, if you want to show how your brand solves that problem.
f. Compare features
If the reader is ever going to consider your brand, you want to gain their trust.
That’s why it’s important at this stage that you give a fair and realistic assessment of each competitor.
Use a consistent structure, such as:
- Competitor 1: Description of feature/aspect
- Competitor 2: Description of feature/aspect
- Our take: Brief, balanced analysis
This is a great time to weave in customer reviews and your own personal experiences.
Drop in rich media like screenshots, videos, or social media embeds to add credibility and real-world context.
g. Wrap up with recommendations and drop in your brand
To wrap up, give the reader clear guidelines on when to choose competitor 1 vs competitor 2 based on different user needs or scenarios – then offer your product as an alternative.
Keep your brand insertion subtle and short, giving more word count to the main two competitors.
A step-by-step guide runs through a series of chronological steps to achieve an end goal.
Examples
- How to Get on the First Page of Google [Interactive Guide]
- How to Become an SEO Expert (8 Steps)
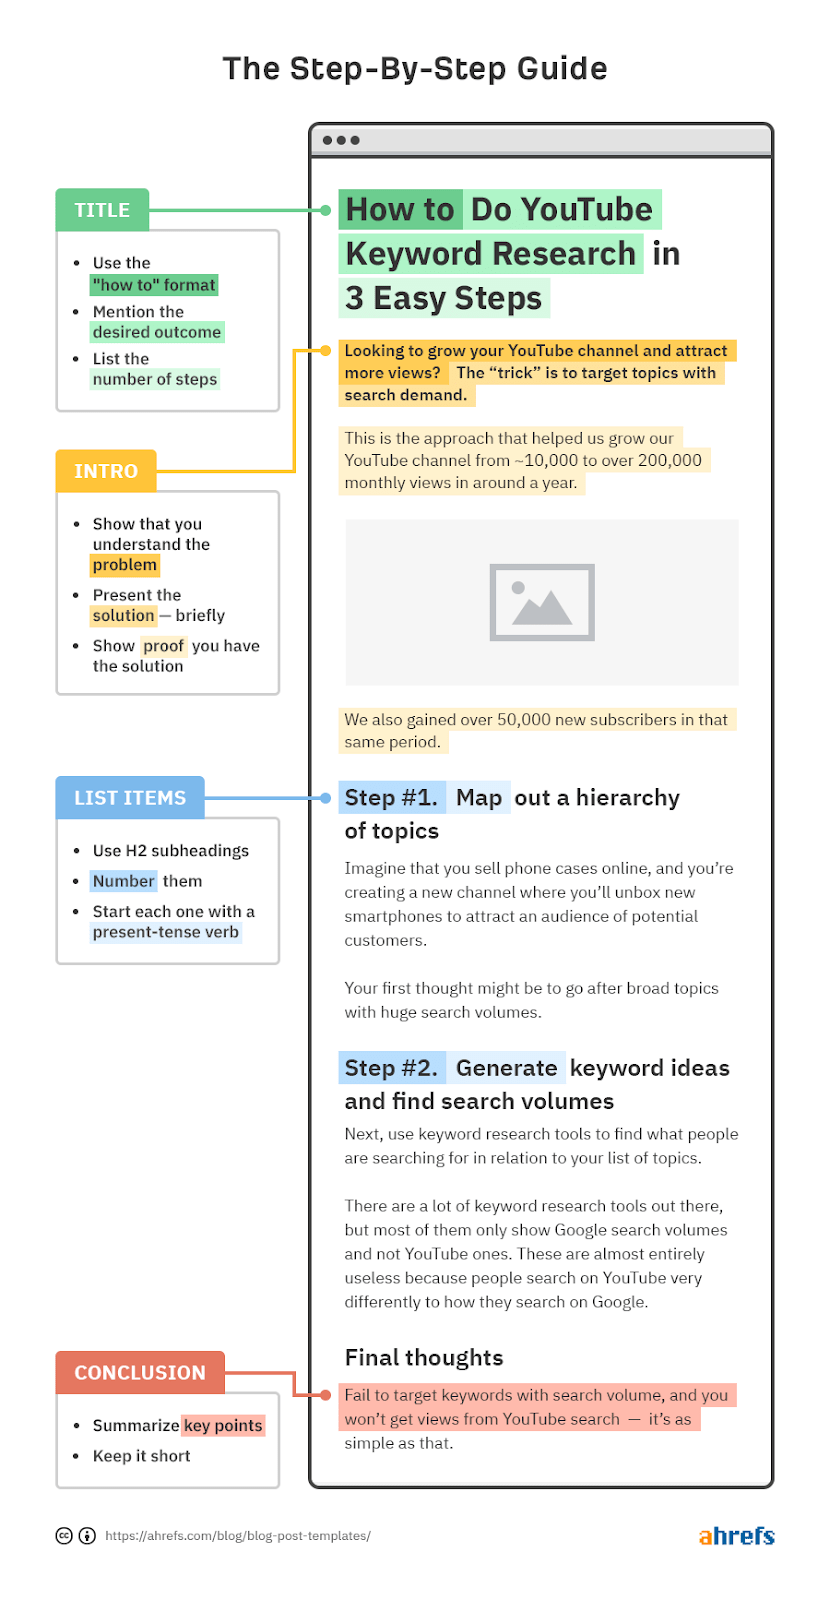
- How to Do YouTube Keyword Research in 3 Easy Steps
- How to Write a Blog Post in 9 Steps (That People Actually Want to Read)
- How to Create SEO-Friendly URLs (Step-by-Step)
Grab the blog template & start writing
Get all of the tips in this blog in a Google/Word doc, so you can see what to include in your next step-by-step guide, as you’re writing it.
Grab the free blog template here.
What kind of content is this template best for?
If you’re teaching people how to do something, and that process needs to be done in a specific order, then a step-by-step guide is the solution.
For example, take a look at our guide to writing a blog post:
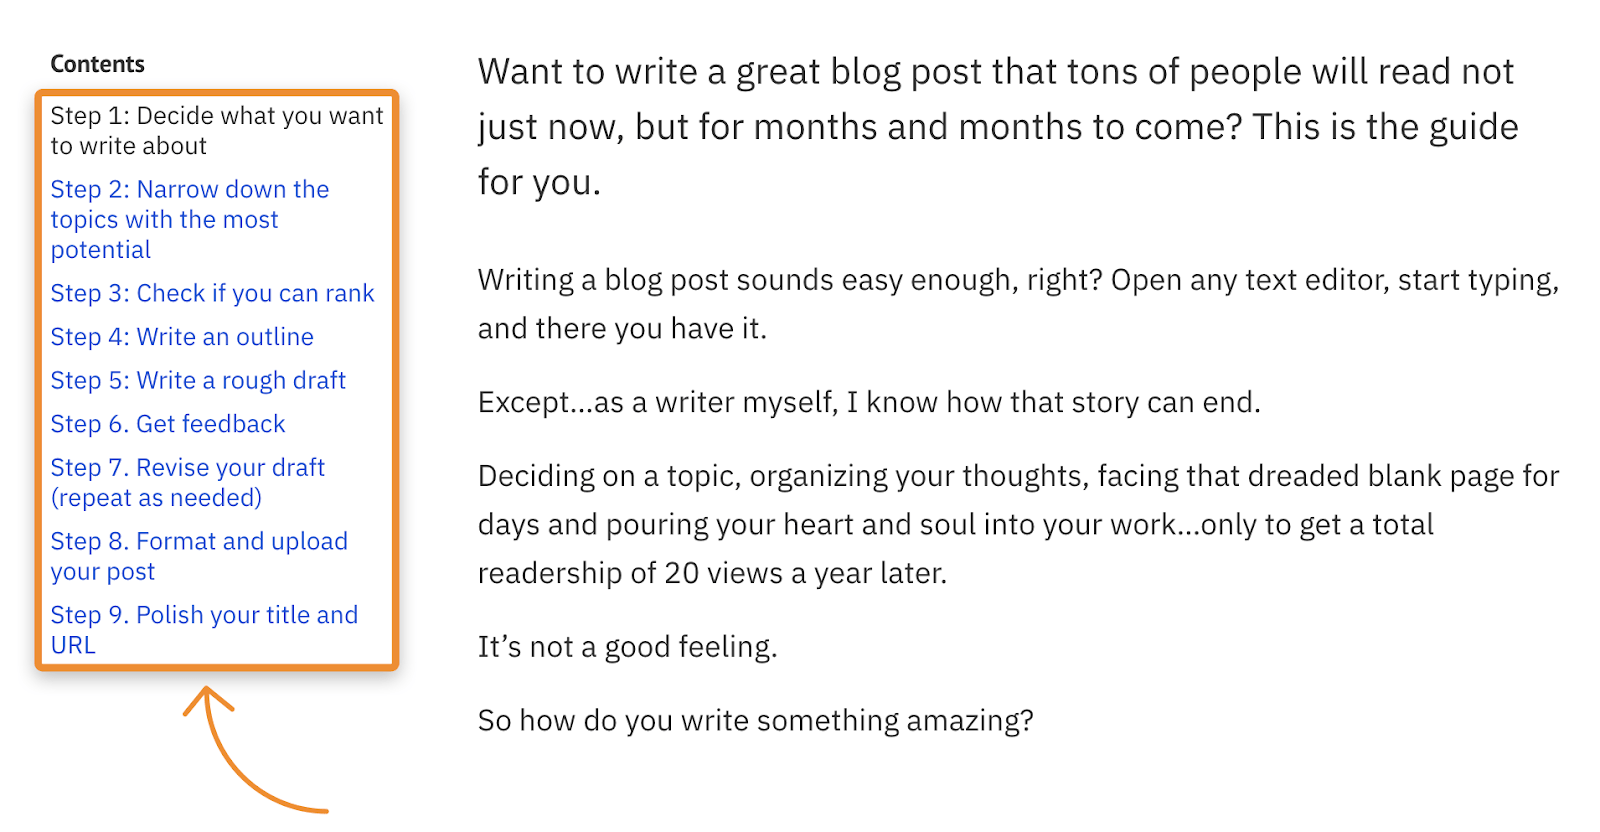
Each of these steps has to be done in order. You wouldn’t write a draft before you write an outline, and you wouldn’t write an outline before choosing a topic. That’s the key difference between step-by-step guides and list posts.
How to use this template
Follow these steps.
a. Create a “how-to” title
Every step-by-step guide has roughly the same title format: How to [Achieve Desired Outcome]
However, it doesn’t have to be that boring. There are variations.
Here are just a few:
- How to [Achieve Desired Outcome] (XX Steps)
- How to [Achieve Desired Outcome] (Even If [Common Obstruction])
- How to [Achieve Desired Outcome] (Additional Benefit)
b. Write a short trustworthy intro (PSP Formula)
If you’re teaching people how to do something, they’ll want to know why they should trust you. There are lots of ways to do this, but one we often use is the PSP formula.
- Problem: Show that you understand the issue at hand.
- Solution: Present the solution—briefly.
- Proof: Demonstrate your experience and success in solving the problem.
Here’s an example of the PSP formula in action:

c. Use numbered steps for subheadings
Use H2s to break the process down into steps. Then explain that part of the process in more detail under each subheading.
For example, here are the H2’s from our guide to YouTube keyword research:
- Step 1: Find keywords that perform okay, but not great
- Step 2. Choose a keyword that you want to rank higher for
- Step 3. Figure out why you’re being outranked
- Step 4. Beat the other pages where it matters
- Step 5. Track rankings
- Step 6. Rinse and repeat for other keywords
Where possible, start each step with a present tense verb.
d. Conclude with a quick summary
Don’t overthink this. Just summarize the process you taught people in the post.
Contrarian thought leadership posts challenge conventional wisdom in the industry, with fresh perspectives on familiar topics.
They’re designed to make people think, talk, share and—by proxy—can help you position yourself as an innovator.
With this kind of blog post template, it’s important to strike a balance between being provocative and credible. Don’t just say something left-field, or even inflammatory, for the sake of engagement.
Make sure you have useful information to share, and base your arguments on solid evidence and reasoning.
Examples:
- AI Content Is Short-Term Arbitrage, Not Long-Term Strategy
- There’s No Such Thing as “Accurate” Search Volume
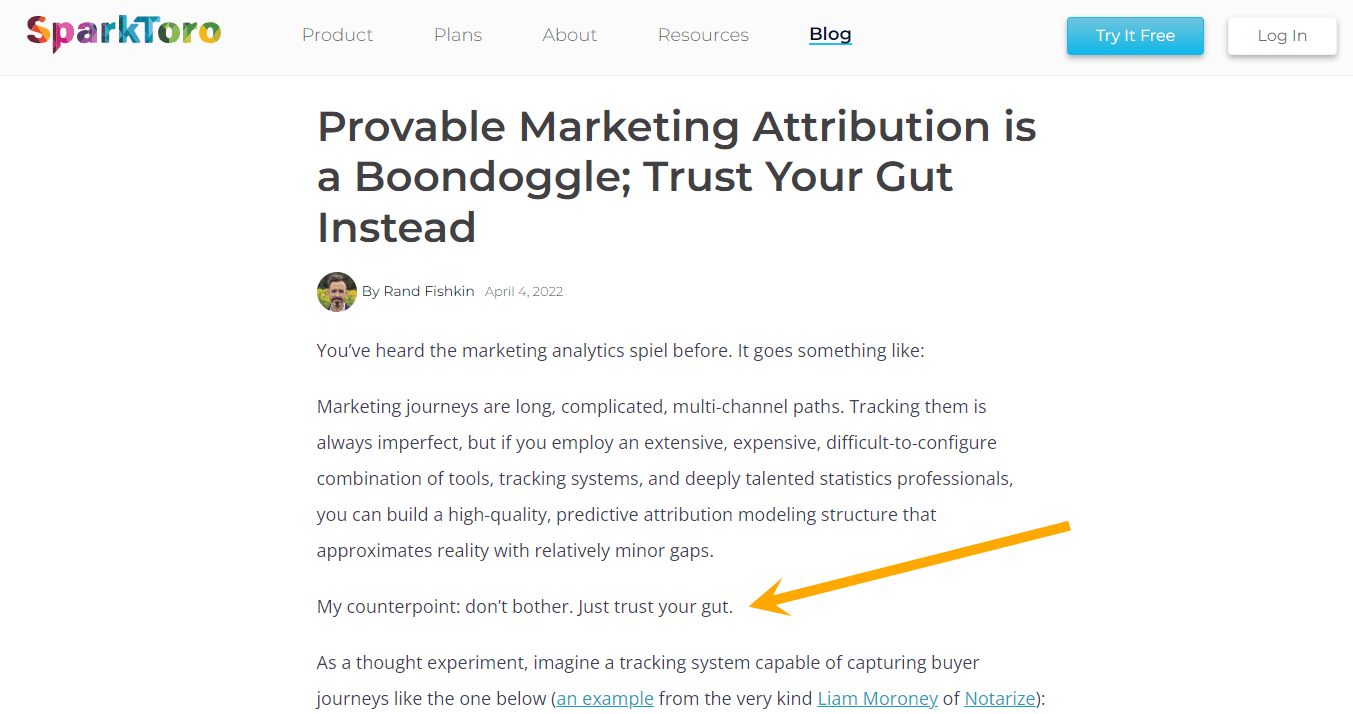
- Provable Marketing Attribution is a Boondoggle; Trust Your Gut Instead
Grab your free template
Get the “Contrarian thought leadership” template for your blog.
The template includes additional sections that I haven’t included below, for the sake of brevity.
You can and should add these in to reaffirm your position as a thought leader.
What kind of content is this blog template for?
This blog post template works well when you have a unique, well-reasoned perspective that goes against the grain of common industry beliefs. It’s ideal for:
- Challenging widely accepted practices
- Proposing innovative solutions to recurring problems
- Predicting industry trends that others haven’t recognized yet
How to use this blog post template
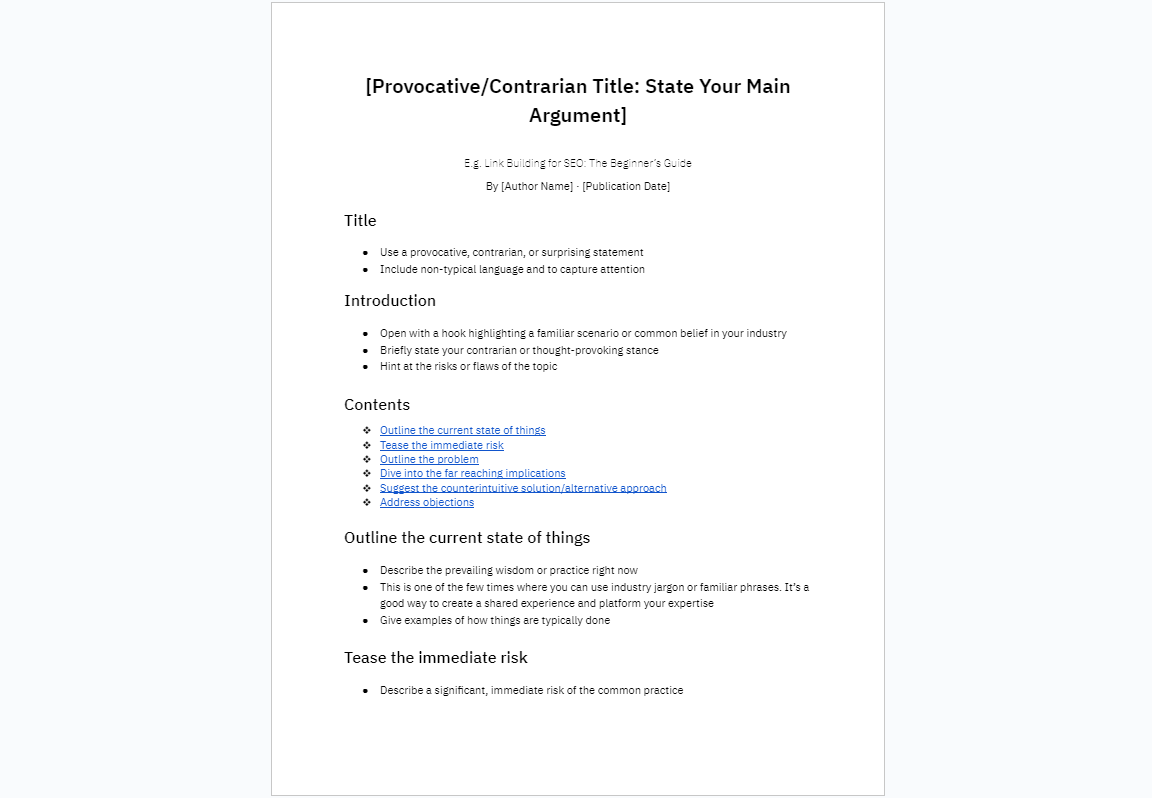
a. Come up with a provocative title
Your title should immediately signal that you’re challenging the status quo.
Use a provocative, contrarian, or surprising statement and try to include non-typical language to really grab the reader’s attention:
- Why [Common Practice] Is Totally Illogical (And What to Do Instead)
- When It Comes to [Topic], Just Take The “L”
Forget [Common Advice]: Here’s What Really Matters in [Industry]
b. Reel them in with a hook
Kick things off by acknowledging the common belief you’re challenging. Then, confidently state your contrarian view.
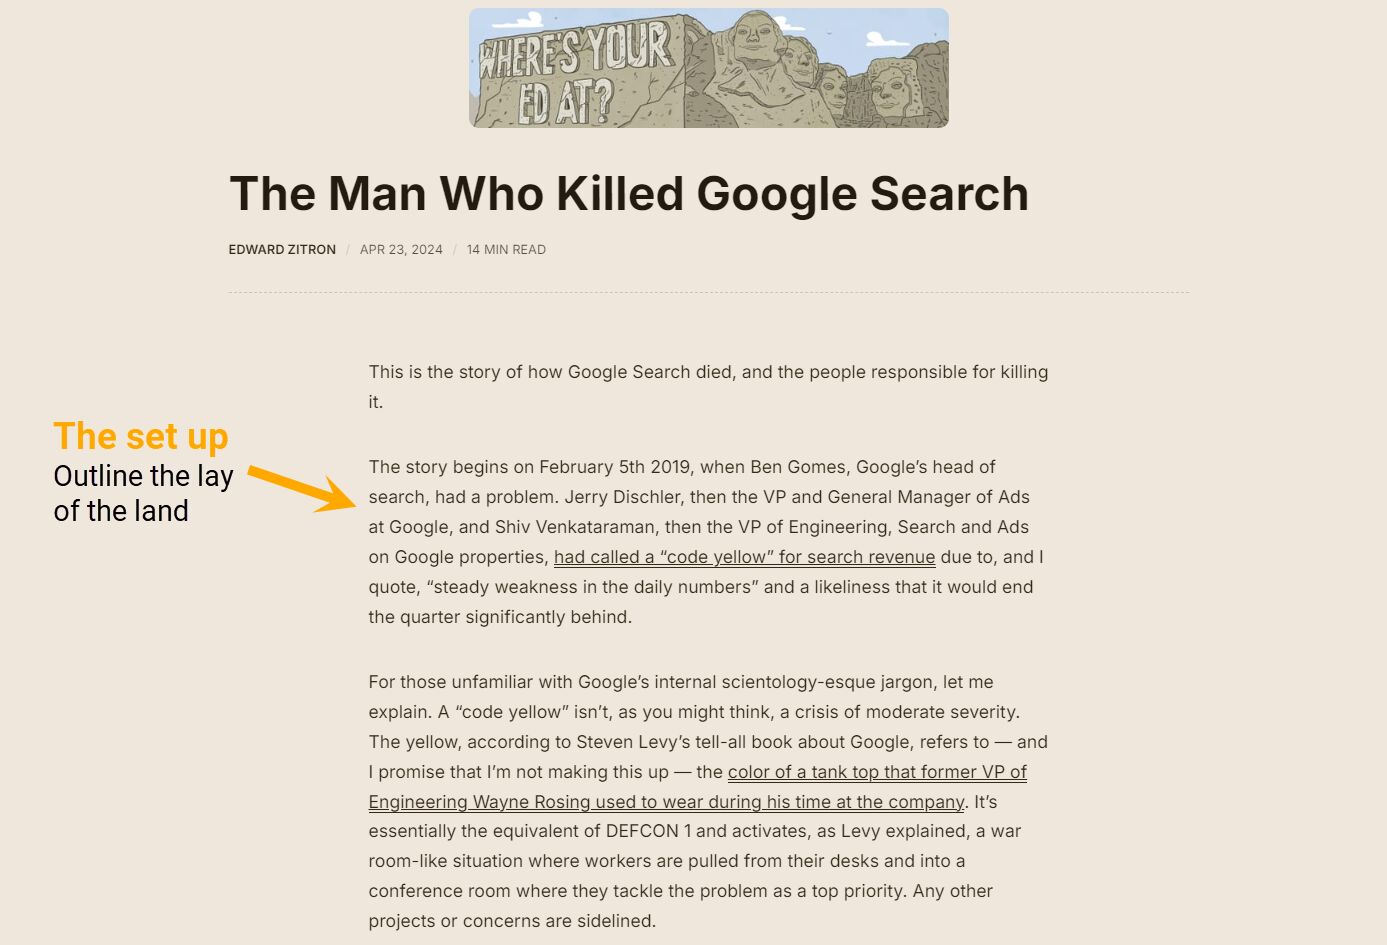
c. The set up
Outline the current state of things and describe the prevailing wisdom in your industry.
This is one of the few times where you can use industry jargon or familiar phrases – it’s a good way to create a shared experience and platform your expertise.
You can also give quick examples of how things are typically done in the industry.
d. State the unequivocal problem
Move on to explaining why the current approach to X is flawed. It’s good practice to include a mix of logical arguments, data, and real-world examples to make your case.
e. Dangle the carrot and provide the proof
Present your contrarian view as a solution to the problems you’ve mentioned, then explain why it works, despite maybe seeming counterintuitive. Make sure you back up your argument with data, case studies, or expert opinions.
f. Get the jump on objections
You want to anticipate potential criticisms of your approach and address them directly. This will show that you’ve clearly thought through your position on things.
g. Drive your point home in the conclusion
Wrap up by summarizing your central argument, and encourage readers to question their assumptions by experimenting with your approach. You can even invite them to take the discussion over to social media.
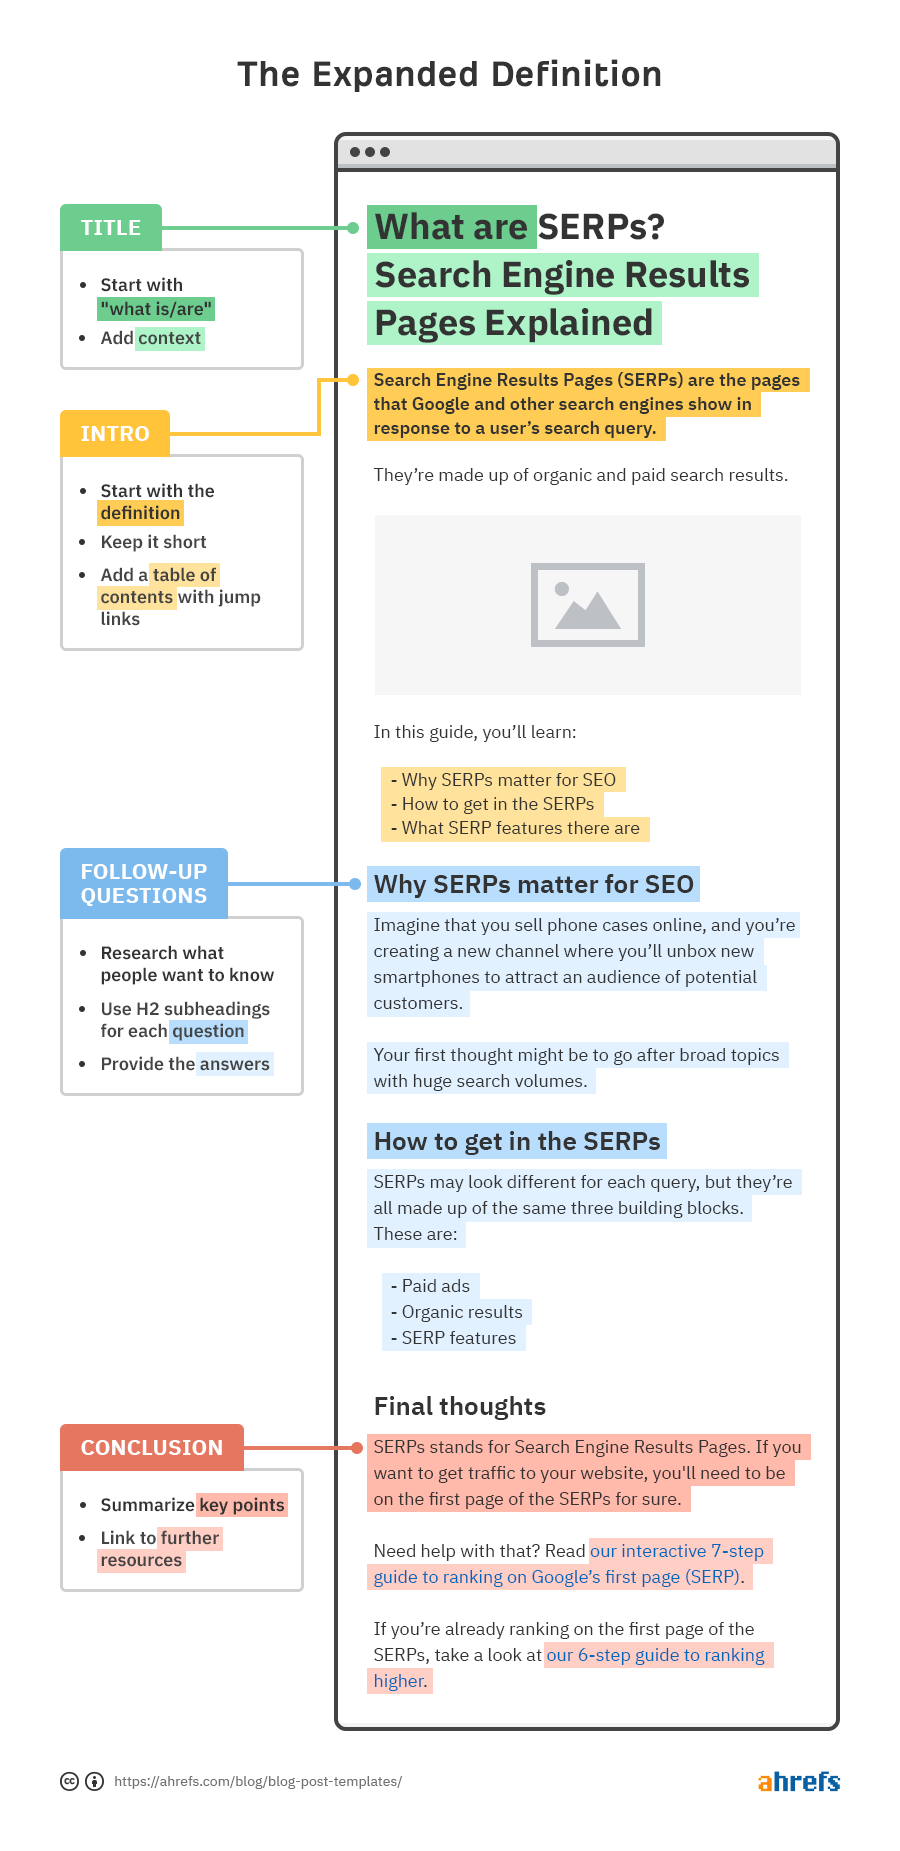
Expanded definitions explain the meaning of a thing or concept, before going into more detail about it.
Examples
- What is HTTPS? Everything You Need to Know
- What are SERPs? Search Engine Results Pages Explained
- What is a Backlink? How to Get More Backlinks
- What is SEO? Search Engine Optimization Explained
Download your free blog post template
Get the “Expanded definition” blog post format here, so you can write along as you read the tips in this article.
What kind of content is this template best for?
If readers will find it hard to follow the ins and outs of your post without first understanding a thing or concept, then this is probably the best format.
For example, take our post about SERPs. It goes into detail about why SERPs are important, how to get in the SERPs, and SERP features. However, because SERP is an acronym, most readers will be completely lost unless we first define that term. So we did that in the first sentence:
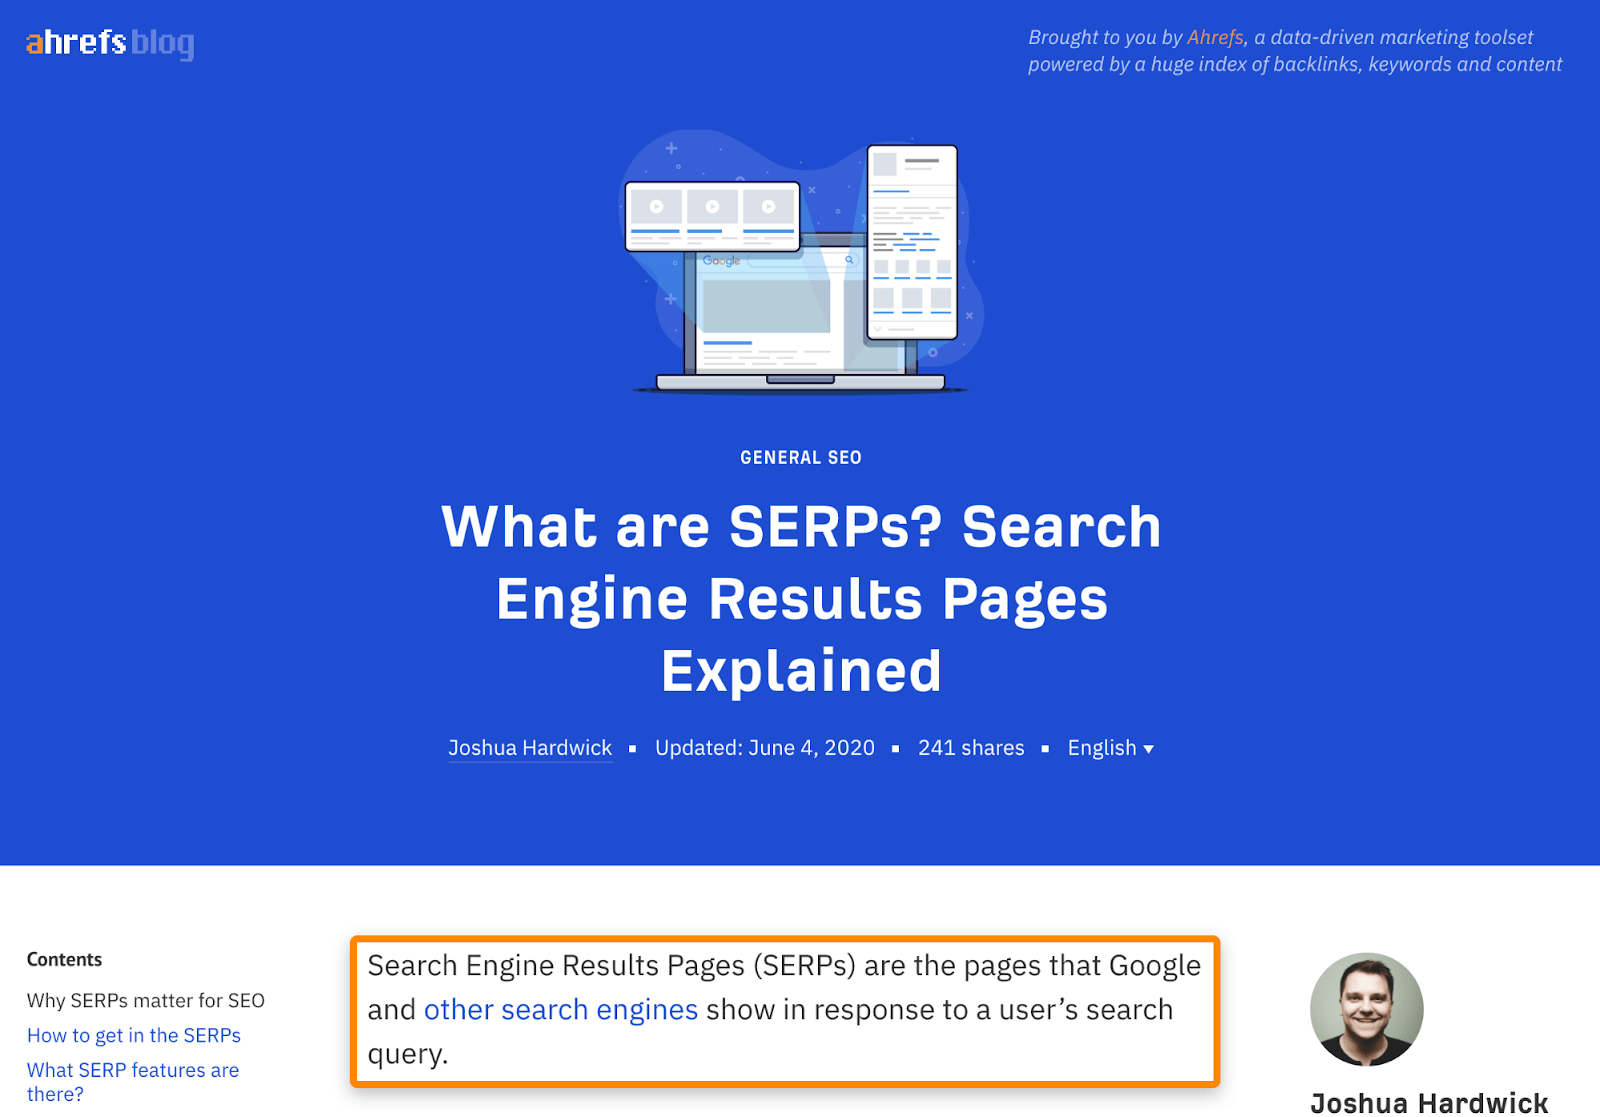
How to use this template
Follow these four steps.
a. Start your title with “what”
Use the “what is” or “what are” format for your title.
Feel free to add context and make your title less dull with one of these formats:
- What is [Concept]? Everything You Need to Know
- What is [Acronym]? [Expanded Acronym] Explained
- What is [Concept]? A [Brief/Quick/Detailed] Introduction
b. Define the term in the intro
Don’t beat around the bush with a long introduction. Start with the definition.
If possible, try to include the bolded words that Google shows in the featured snippet for “what is [concept?]”.
For example, take a look at the featured snippet for “what is guest blogging”:
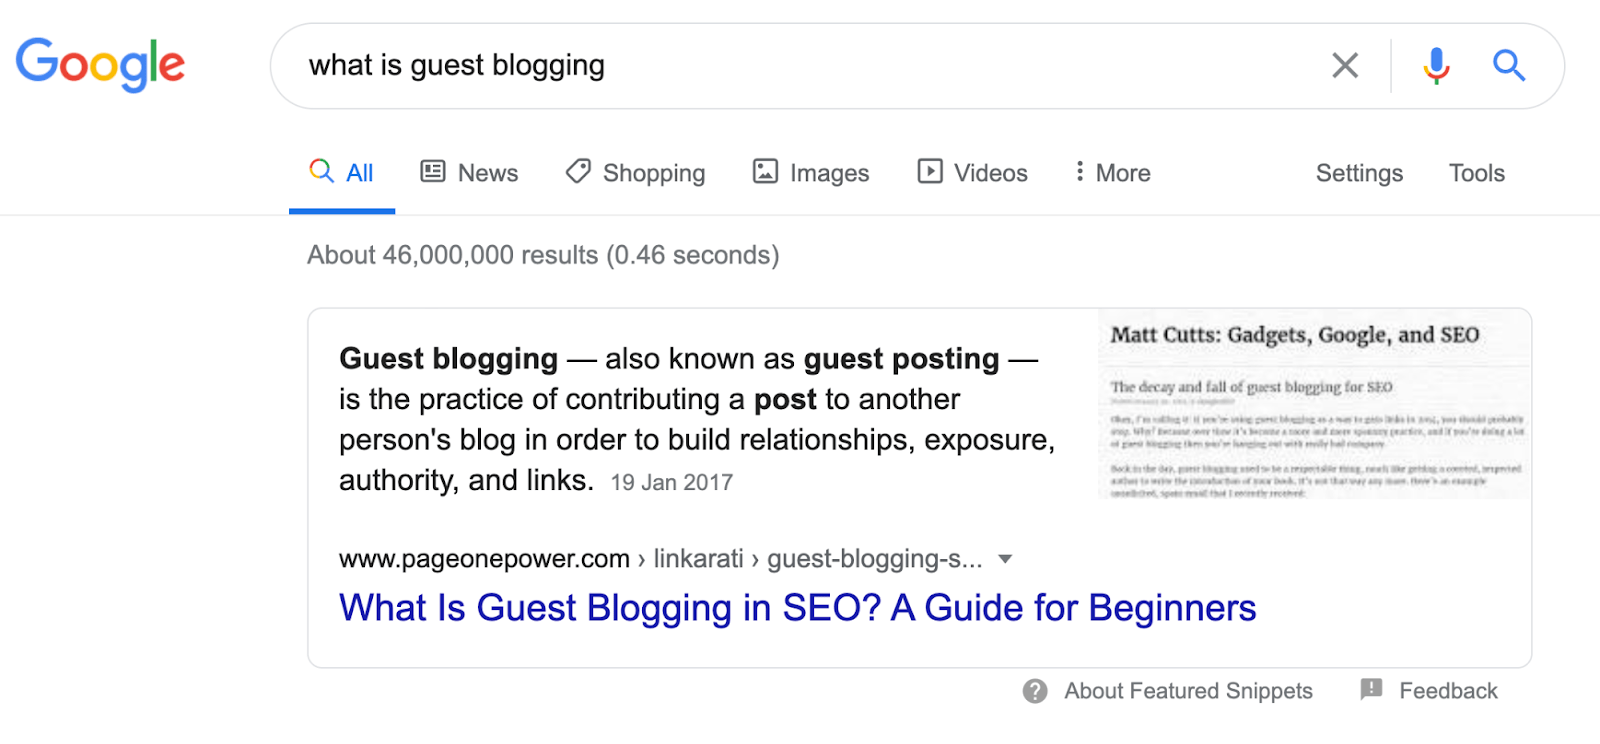
If we were writing an expanded definition post about this topic, we’d want to include “post” and “guest posting” in our definition because they’re bolded in the current snippet. Just don’t force these if it feels unnatural. Your priority is to write a good definition above all else.
Doing this may help us to win the snippet, rank higher, and get more traffic.
Recommended reading: How to Optimize for Google’s Featured Snippets
c. Answer follow-up questions
Definitions are no longer than a few sentences. For the rest of the article, you should answer the follow-up questions that readers might have after learning the definition.
You can find some of these in the People Also Ask (PAA) box in Google.
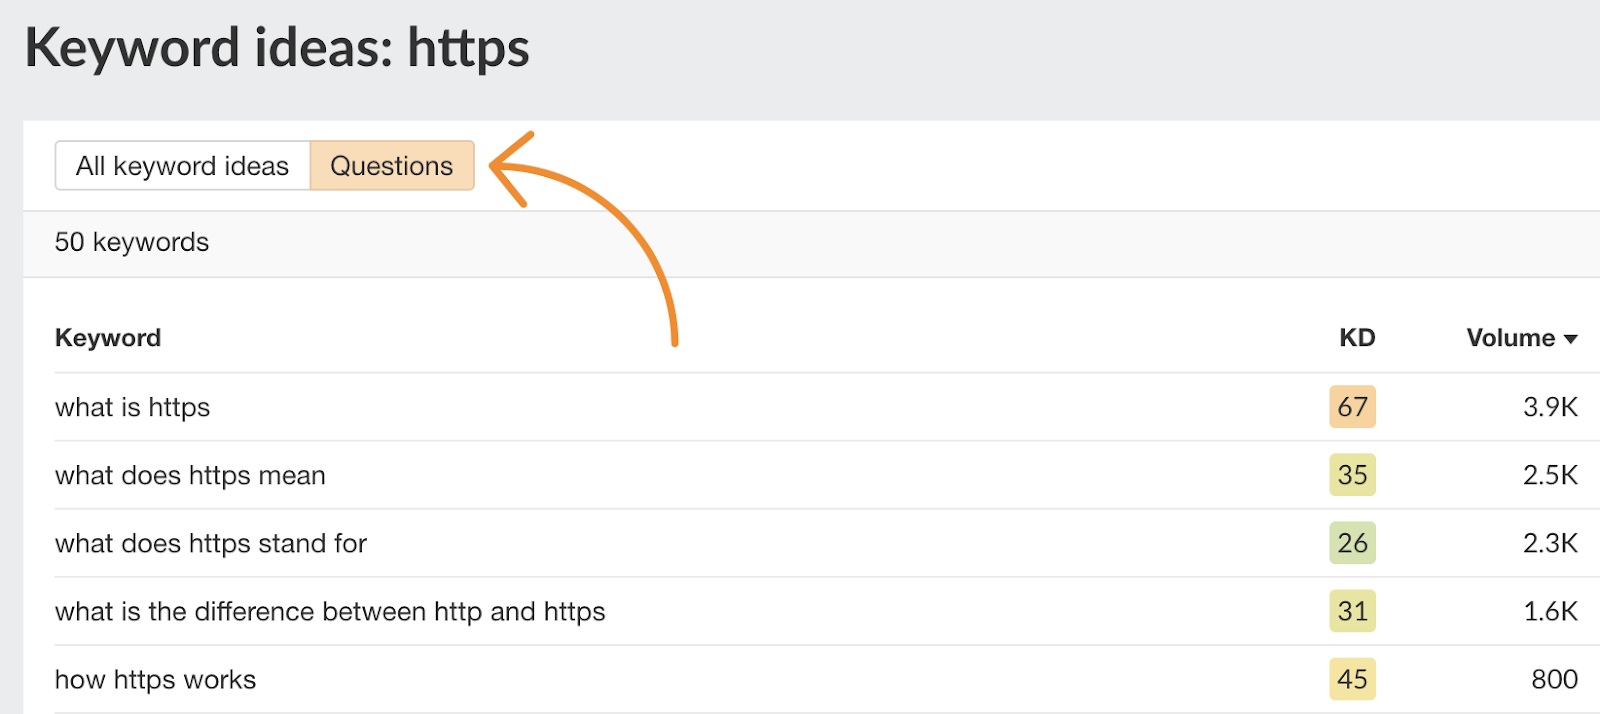
For example, look at the PAA box for “what is https”:
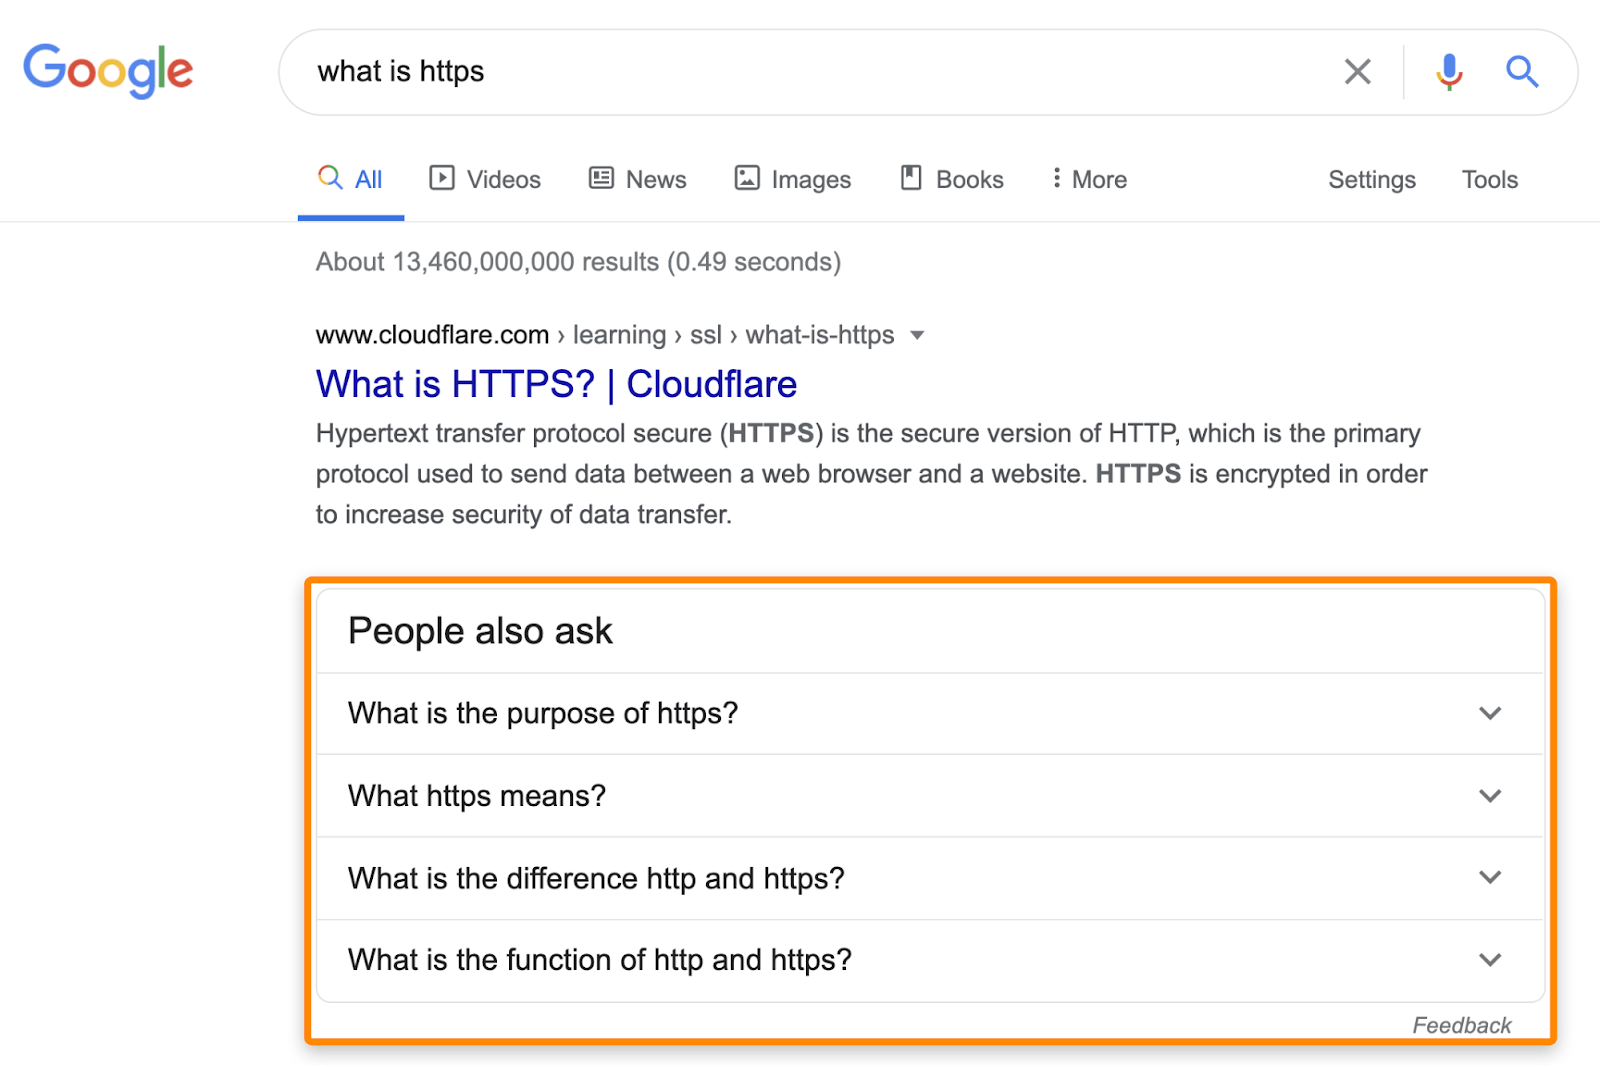
People want to know the purpose of HTTPS and the difference between HTTPS and HTTP. If you were writing a post about this topic, it would probably make sense to use the expanded definition format. You’d give the definition, then answer these questions under H2 subheadings.
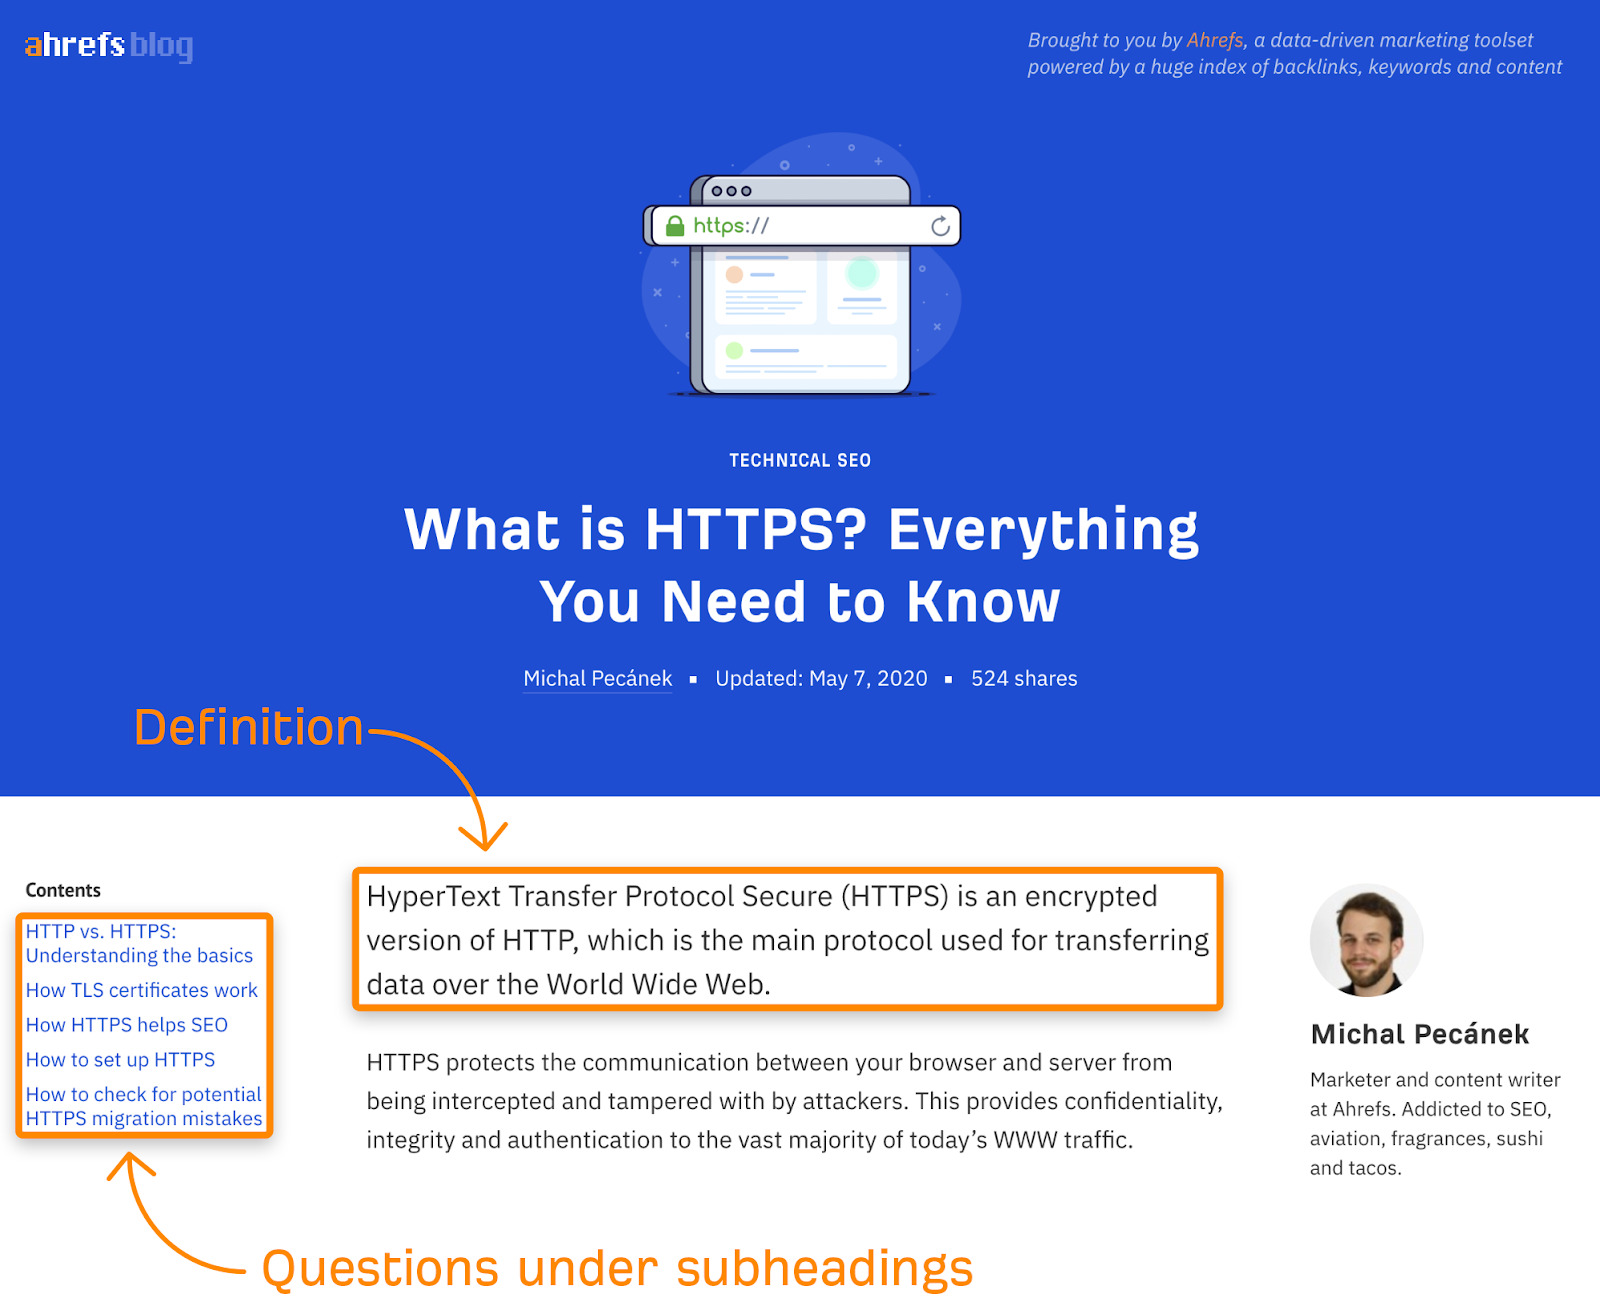
This is precisely what we did in our blog post about HTTPS:
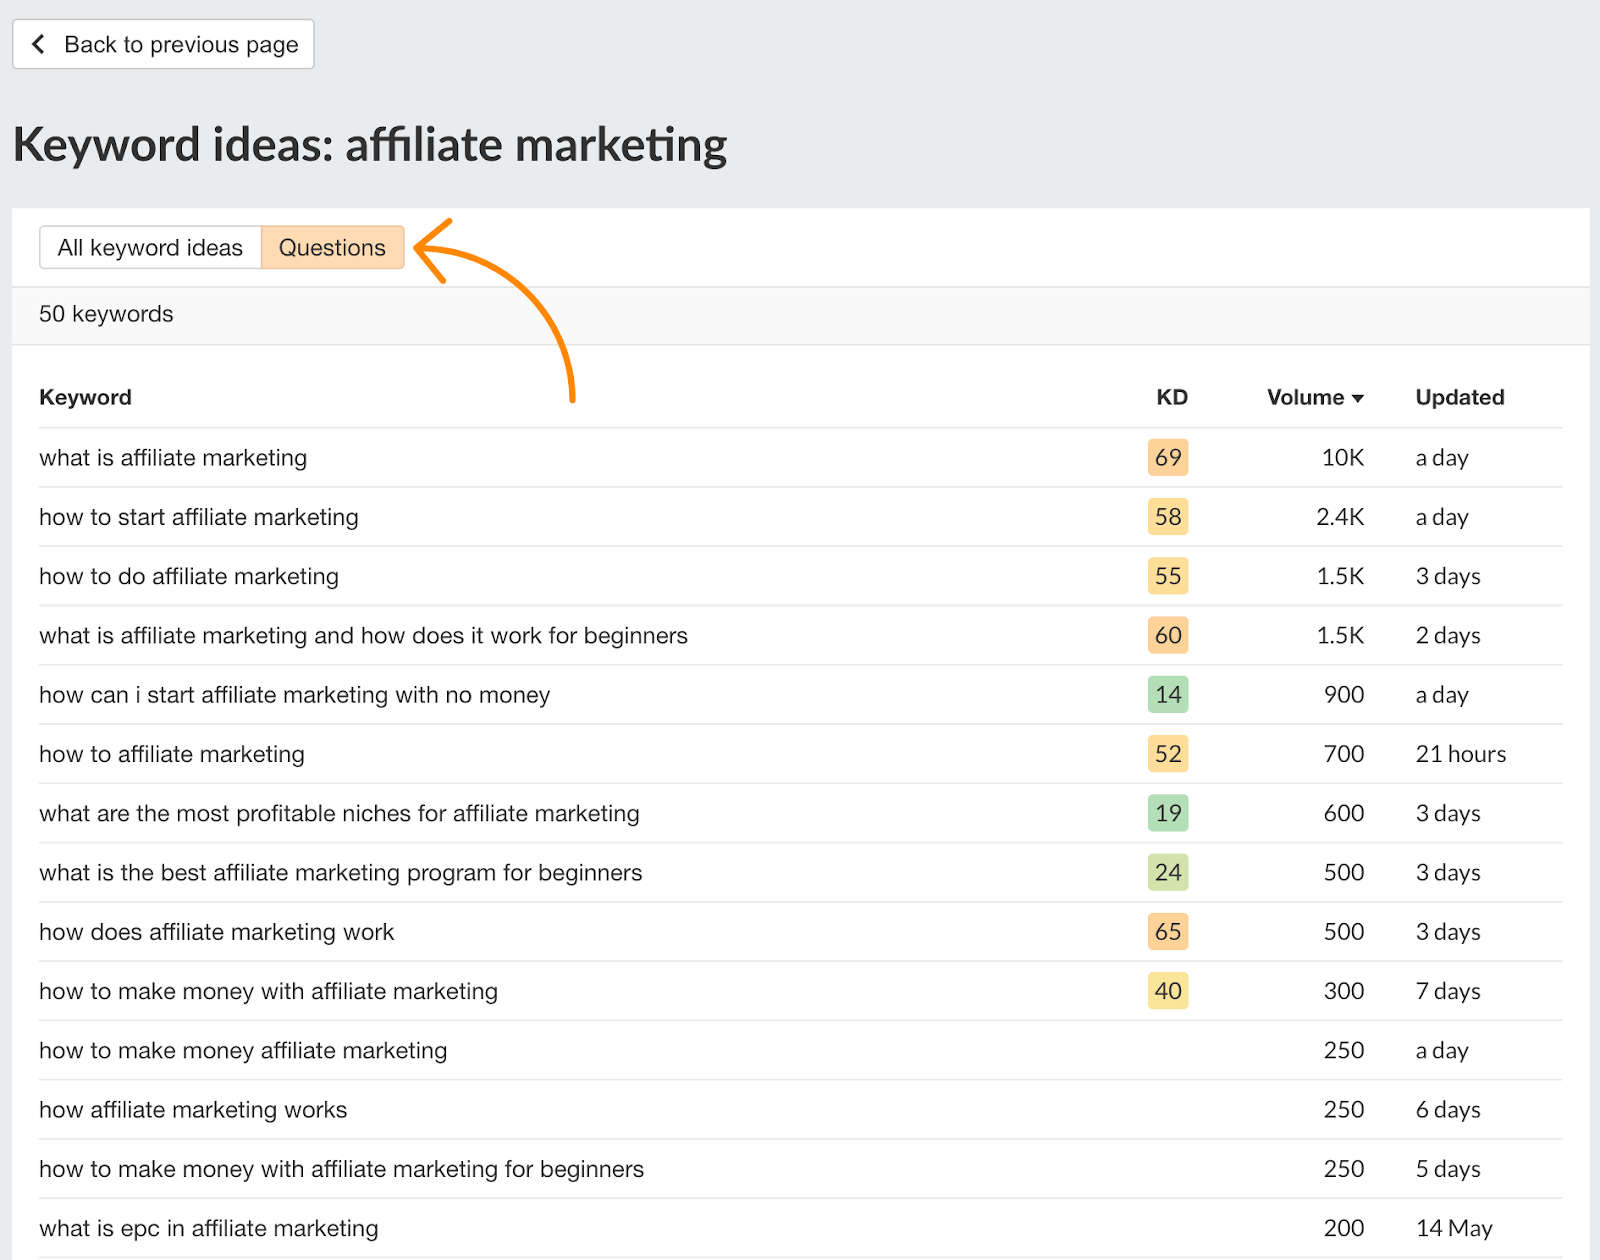
You can find more questions that people are asking about the topic with Ahrefs’ free Keyword Generator. Just type in the topic (e.g., “HTTPS”), hit search, then go to the Questions tab. This shows up to 50 questions containing your search term sorted by their monthly search volumes.
d. Conclude with a short summary
No need to overthink this. Just summarize the key learnings from the post, link to further resources on the topic, and you’re done.
A beginner’s guide is an educational resource that offers a comprehensive introduction to a topic. It should be written in a way that’s suitable for newbies.
Examples
- Duplicate Content: The Complete Guide for Beginners
- Meta Tags for SEO: A Simple Guide for Beginners
- Hreflang: The Easy Guide for Beginners
- The Noob Friendly Guide To Link Building
Download your free blog template here
Save a Google Doc of this blog template. It features all the tips you’re about to read, plus a few more easter eggs.
What kind of content is this template best for?
If you’re planning to write more of an educational resource for beginners than an actionable, step-by-step guide, then the “beginners guide” format is probably the best choice.
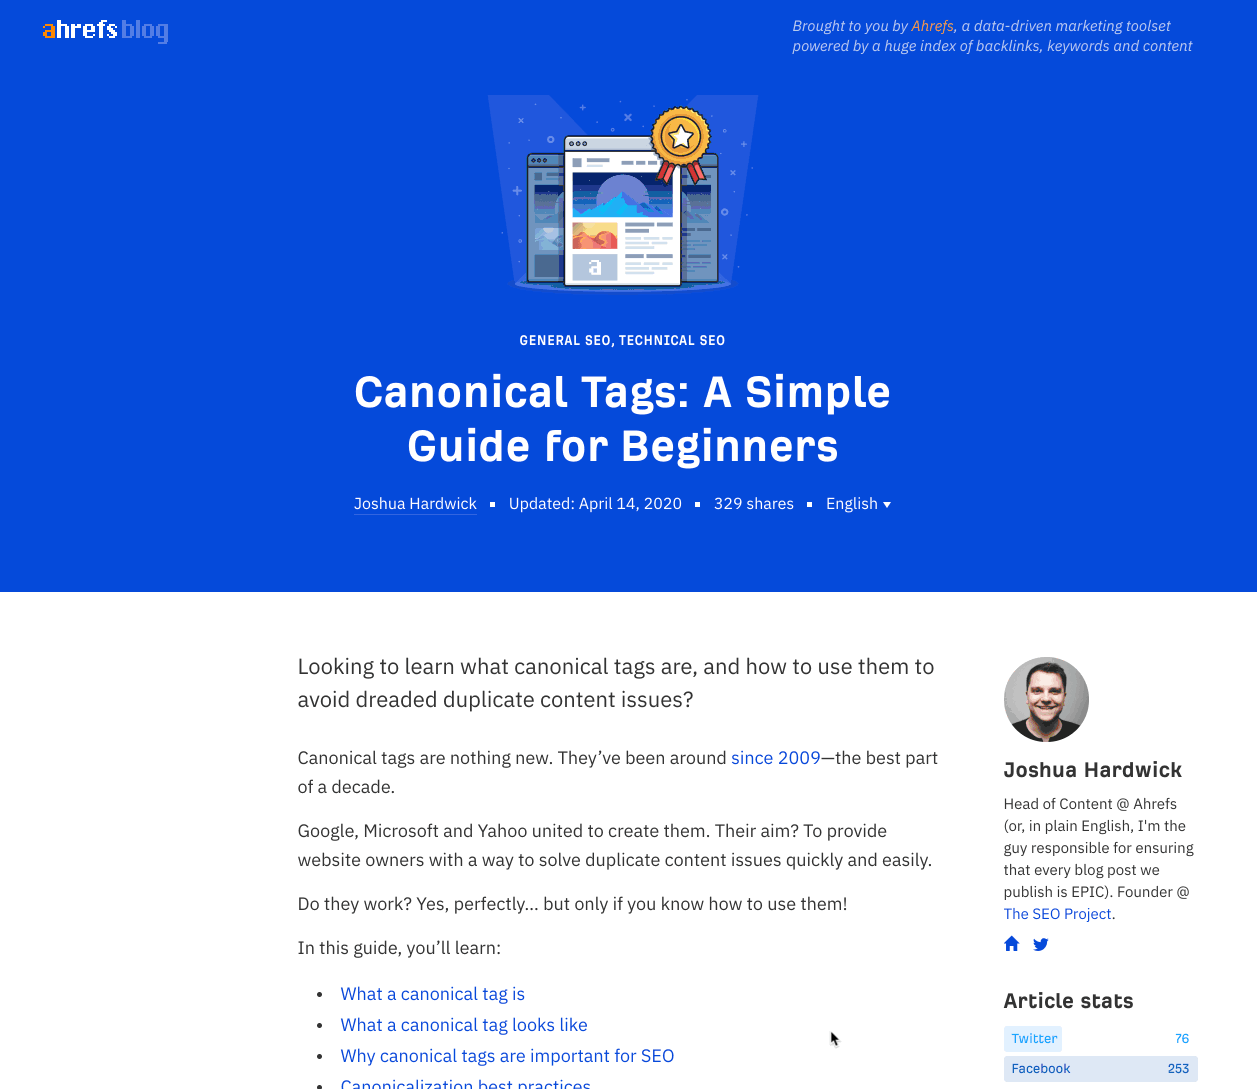
For example, take our beginner’s guide to canonical tags. It explains what a canonical tag is, what they look like, why they’re important for SEO, best practices, how to construct one, how to avoid mistakes, and how to fix existing issues—everything a beginner could possibly need to know.
How to use this template
Follow these steps.
a. Create a title that appeals to beginners
The easiest way to do this is to use the words “for beginners” or similar in the title itself.
- [Topic] For Beginners
- The Beginner’s Guide to [Topic]
- The Noob-Friendly Guide to [Topic]
b. Write a simple and encouraging introduction
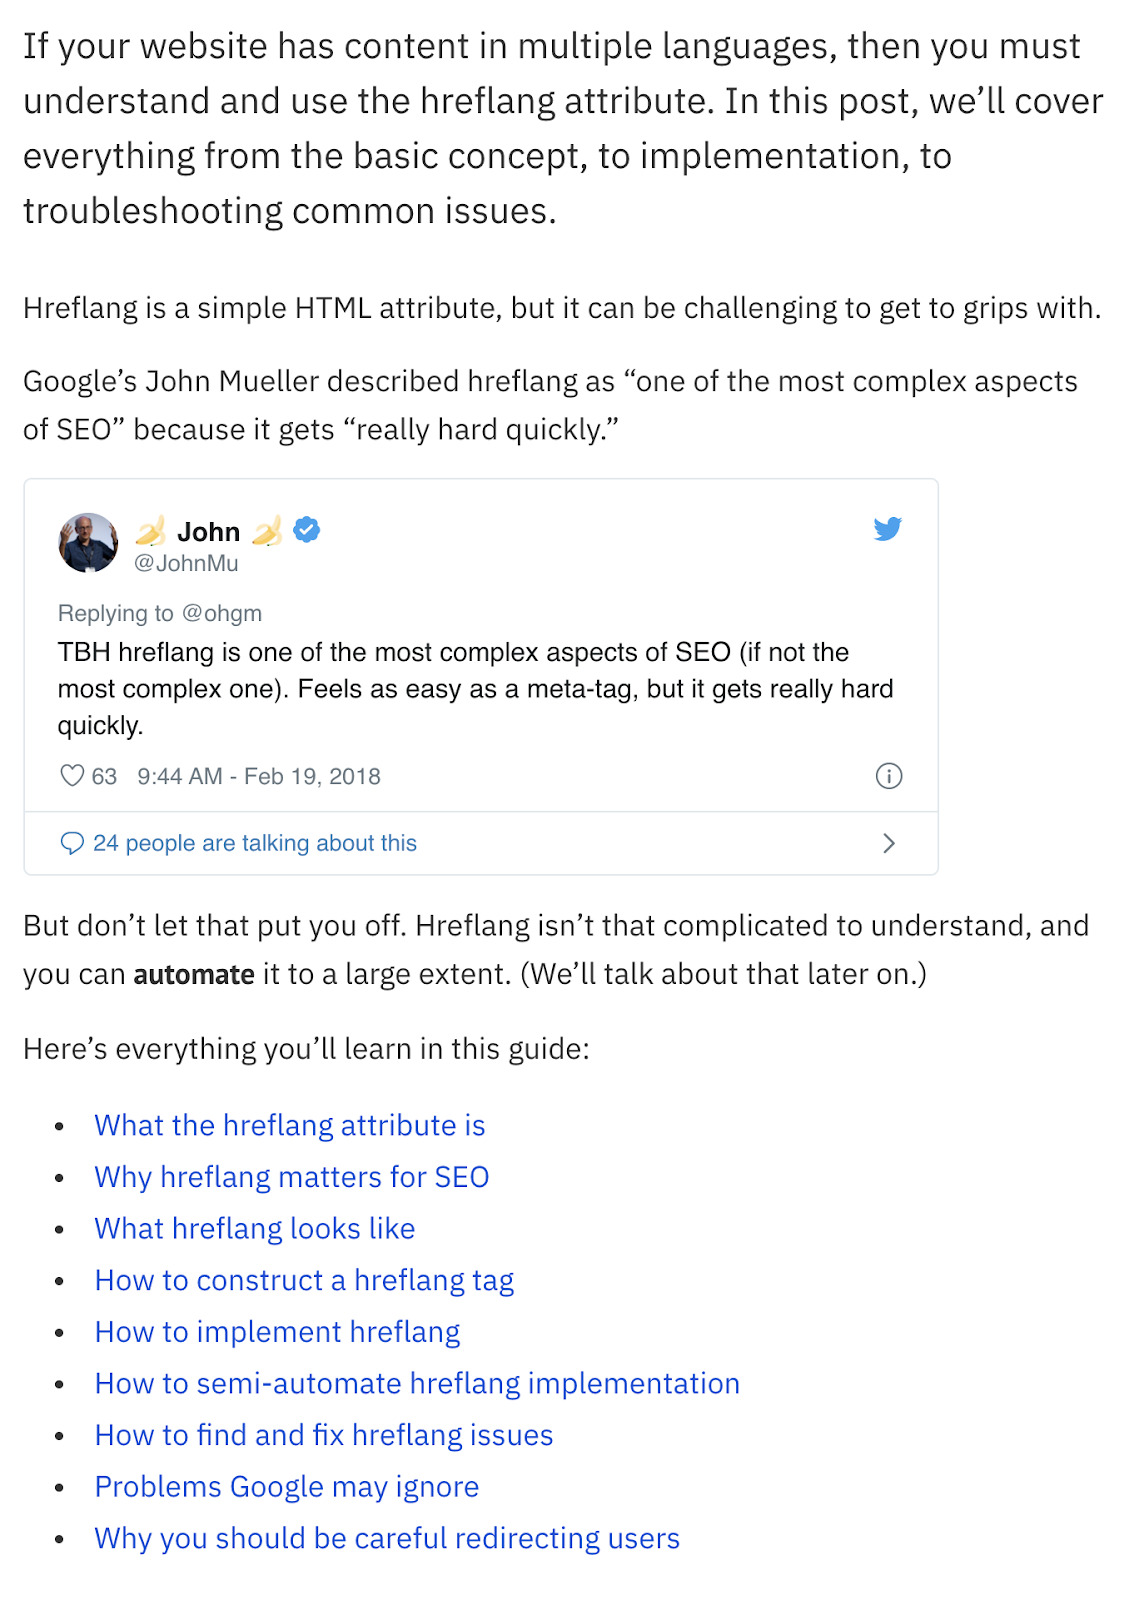
People who seek out beginners guides are precisely that: beginners. So while there isn’t a 1-2 punch formula, you need to make sure that it does four things:
- Reinforce why they need to know this. Most beginners guides are long. Unless you can convince people why they should spend time learning what you have to teach them, they might just call it a day.
- Use simple language. Put their mind at ease right off the bat. Let them know that your post isn’t packed with industry jargon and complex language.
- Encourage them. Explain that the topic isn’t that hard to grasp. Make them feel like they can understand this.
- Tell them what they’ll learn. A linked table of contents should do the trick.
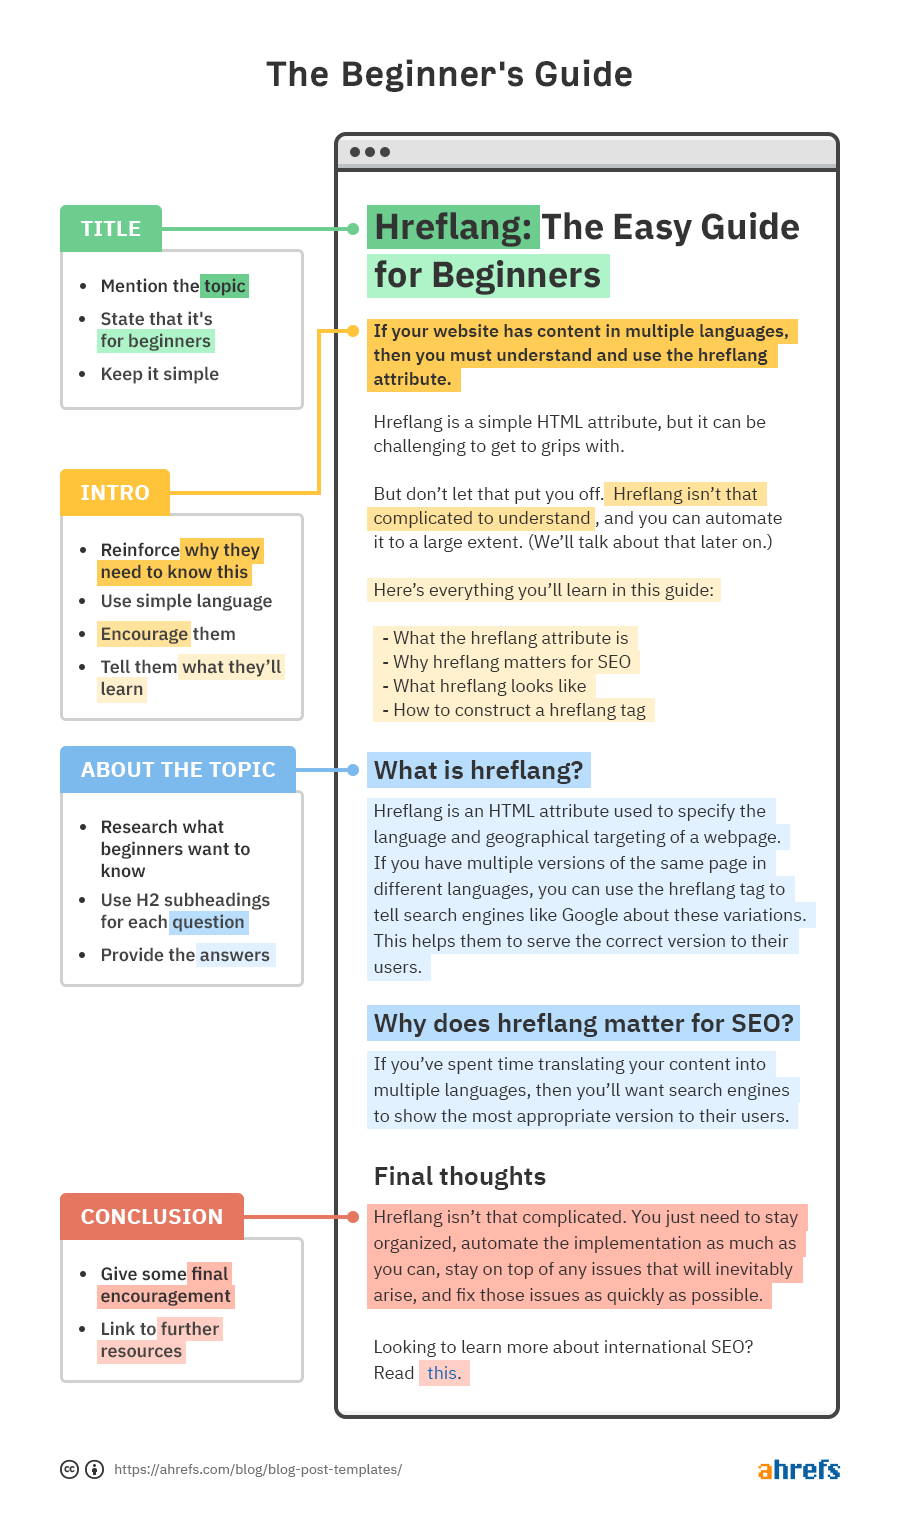
Here’s an example from our beginner’s guide to hreflang tags:
c. Go through everything they need to know
Think about the questions a beginner might have about the topic, and answer them. Use a H2 subheading for each question.
For example, here are the H2’s from our beginner’s guide to affiliate marketing:
- What is affiliate marketing?
- How does affiliate marketing work?
- How much money can I make as an affiliate marketer?
- How to get started with affiliate marketing
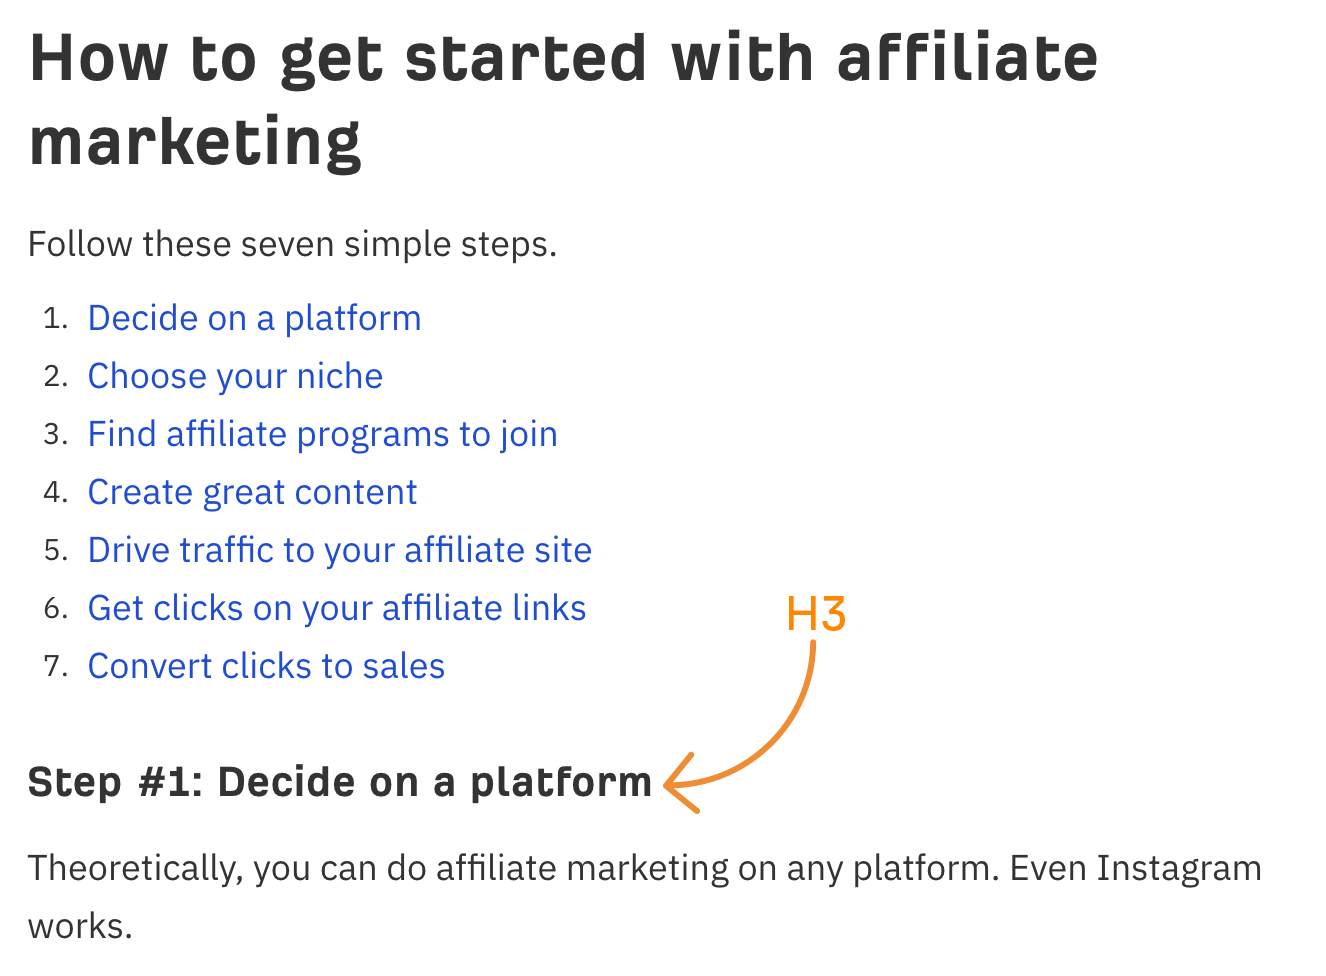
For questions that require long answers or multiple steps, use H3-H6 subheadings under each H2 to provide further hierarchy and make things easier to digest.
This is what we did for the “How to get started with affiliate marketing” section in our guide:
If you’re not sure what questions a beginner might want to know the answer to, look at Google’s People Also Ask (PAA) boxes or find popular questions using Ahrefs’ free Keyword Generator.
d. Conclude with encouragement and further resources
There are tons of ways to conclude beginners guides. However, we tend to end ours with some final encouragement and links to further reading.
Which blog post template should you use?
Each of these templates work best for a particular type of content. But the question is, what type of content should you create?
For example, say that you run a coffee blog. You’ve done your keyword research and found that “french press cold brew” is a low-difficulty keyword with thousands of monthly searches.
If you want to rank for this term, which of these should you write?
- 10 Tips for Making Cold Brew Coffee Using a French Press
- How to Brew Cold Brew Coffee In French Press
- What Is Cold Brew Coffee? Everything French Press Owners Need to Know
- The Beginner’s Guide to Making Cold Coffee (In A French Press)
- The Best French Press for Making Cold Brew Coffee (Top 10)
The best way to figure this out is to look at what currently ranks. Google works hard to rank the most useful results for searchers, so the top-ranking pages are a good proxy for search intent.
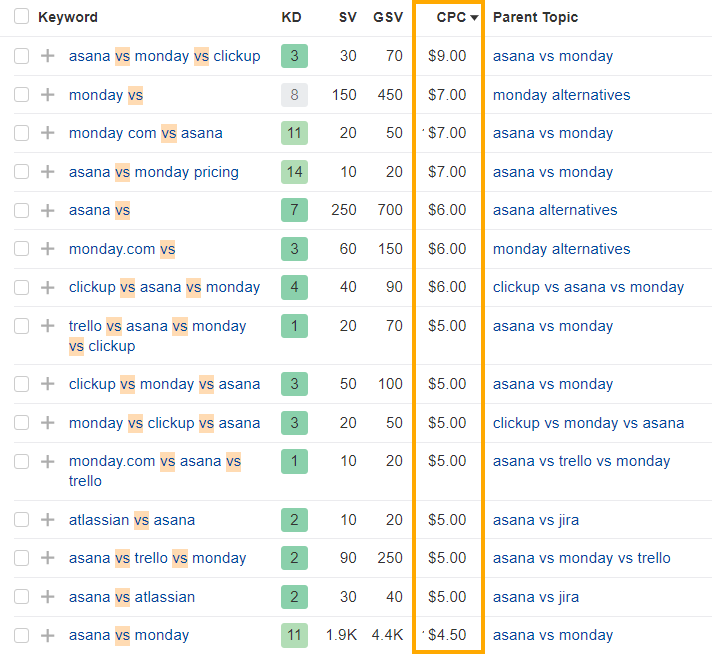
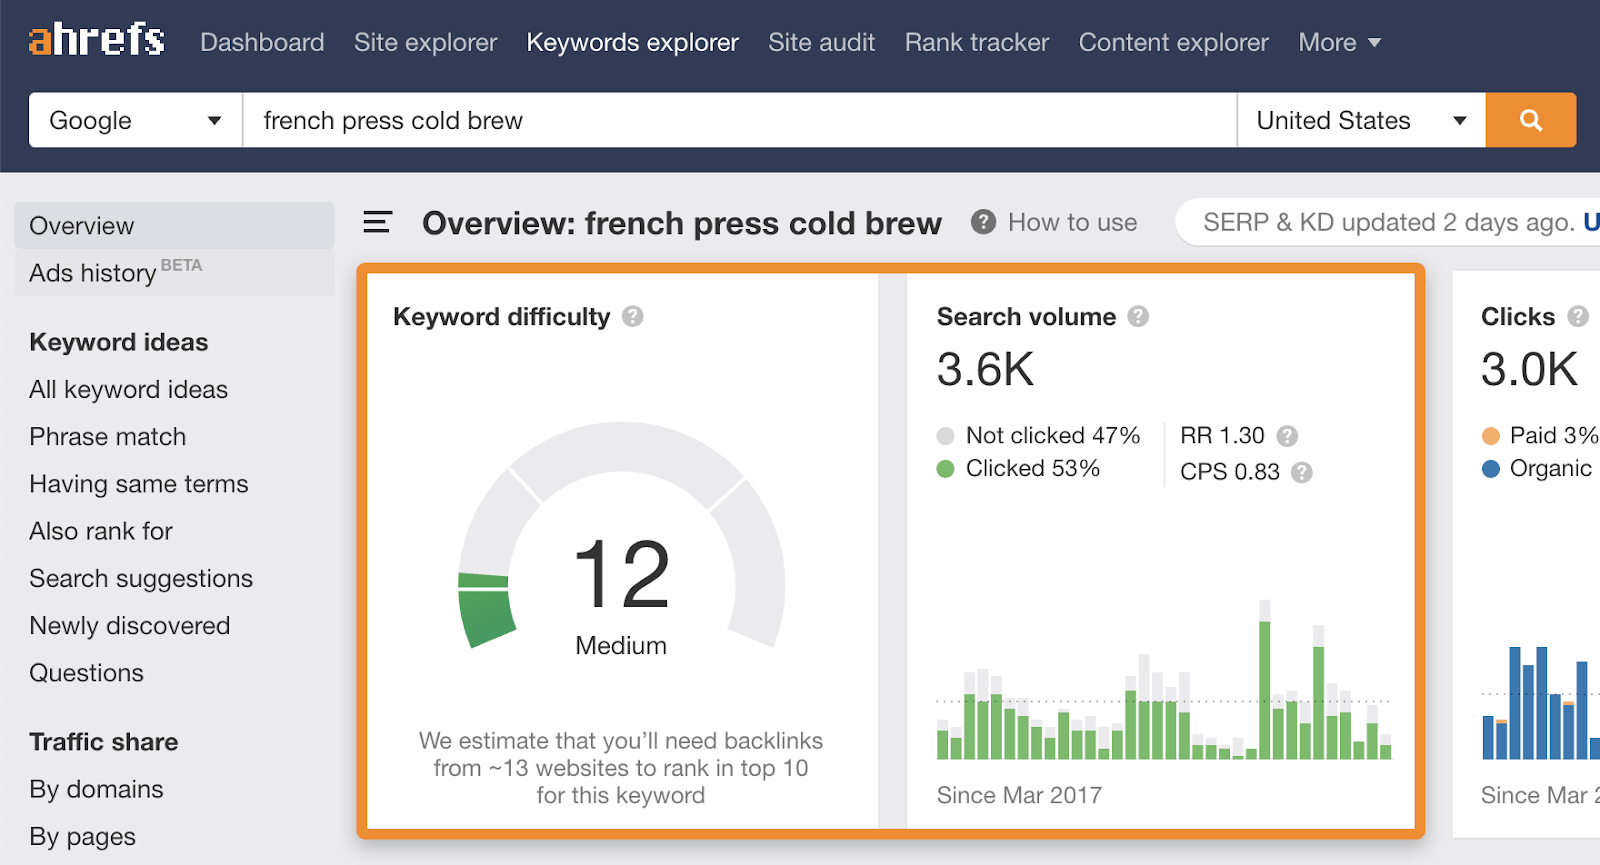
For example, if we look at the top-ranking pages for our target term in Keywords Explorer, we see that almost all of them are step-by-step guides.
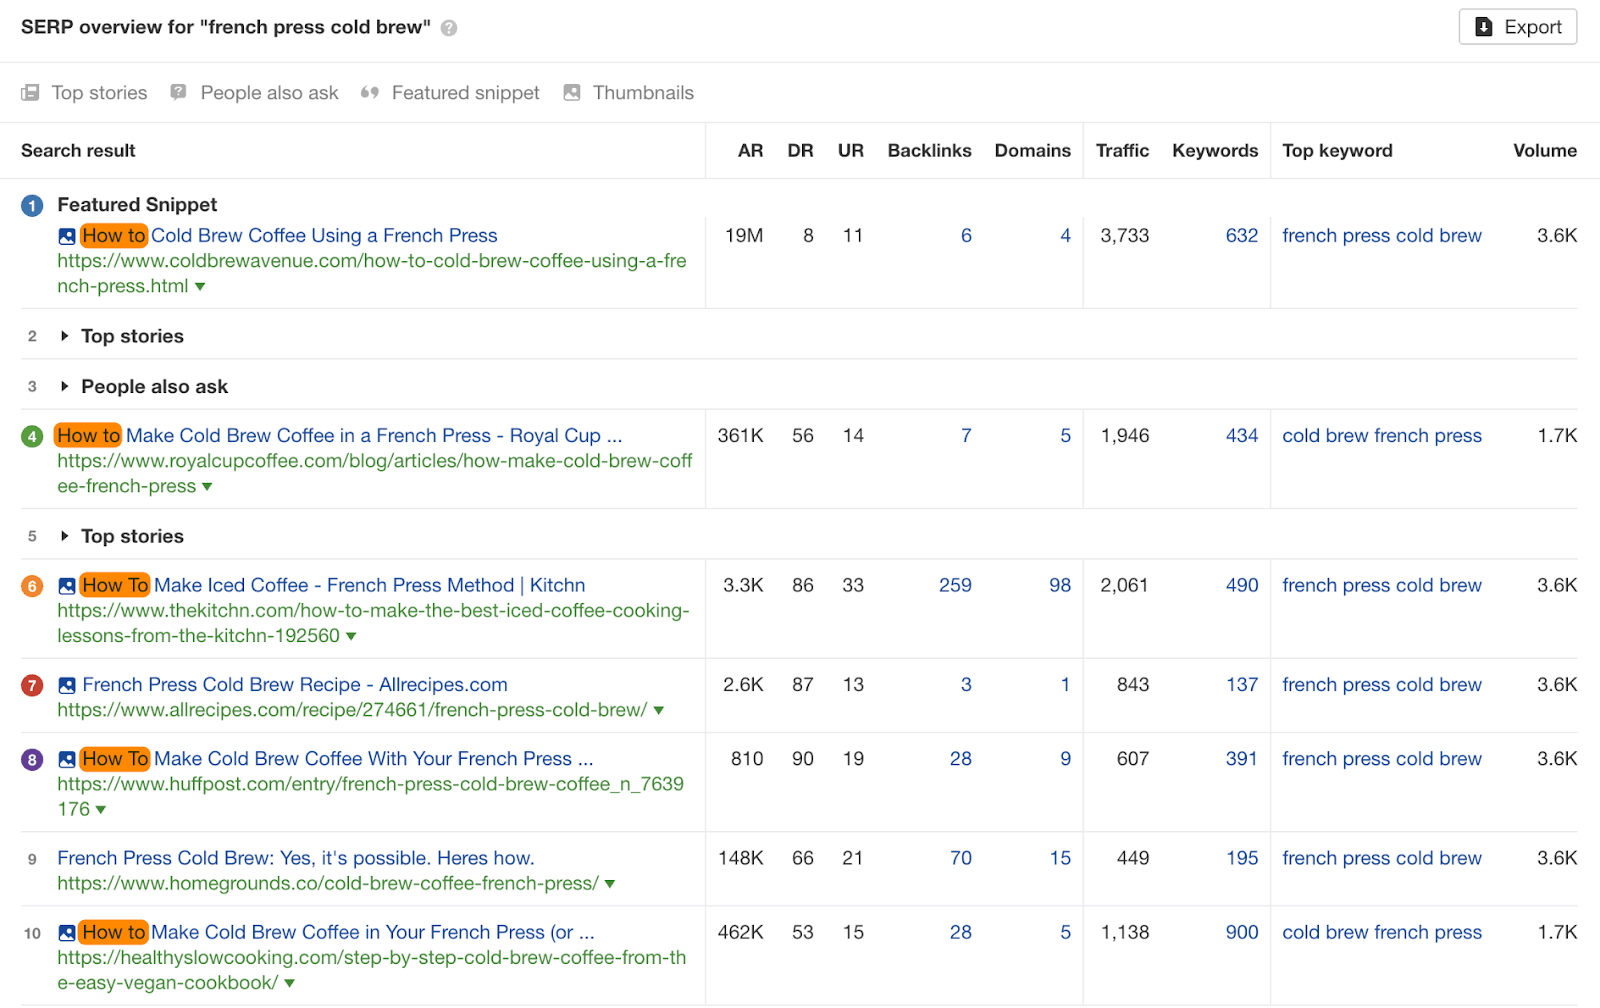
To stand the best chance of ranking for this keyword, we should follow suit.
Just know that search intent isn’t always clear cut. You’ll sometimes see a mix of formats in the results and will have to use your best judgment.
Final thoughts
Although these templates are a good starting point, know that they won’t work for every eventuality. It’s sometimes better to mix elements of one with another.
For example, take a look at our guide to creating SEO-friendly URLs. The first half of the post outlines a step-by-step process, whereas the second half lists best practices. In other words, the post is part step-by-step guide, and part listicle.
Don’t be afraid to mix things up where necessary.
Want more blogging tips? Read this.
Got questions? Ping me on Twitter.


